 |
| The tiller, with several fresh coats of varnish and a new, thicker, protective, aluminum plate |
This is part three of a three-part article on the yard period for
Oystercatcher, my Ericson 25. This lengthy yard period stretched over the late summer, the fall, and the winter of 2019-2020. This posting concerns the period from Dec 21, 2019 to Feb 15, 2020, the date on which I relaunched the boat. I should point out, however, that this yard period actually continued after
Oystercatcher returned to the saltwater where she belonged. The last pictures in this posting date to May 8-9, 2020.
In Part I of this article I discussed my removal of the pulpit from the foredeck. I said that my reason for removing it was that two of the legs on the pulpit were no longer secured to their bases. The weld had broken on one of them, and the set screw had fallen out of the other one. I had been unable to reinstall the set screw, because the mahogany anchor roller platform was obstructing it. My buddy offered to weld the legs of the pulpit onto the bases, which were still on the deck. We decided this would be the best way to ensure that the pulpit would not fail again.
I towed
Oystercatcher over to his house, and we both worked to prepare the deck and the metal for this job.
I used a wire cup brush on a grinder to clean up the stainless steel prior to the job.
We cut up pieces of cardboard and taped them all around the foredeck to protect the fiberglass. See the wet rags? We used these to cool the steel and deck throughout the process. After all was said and done, the deck looked great. I would later remove the pulpit and clean up the welds with my grinder at home.
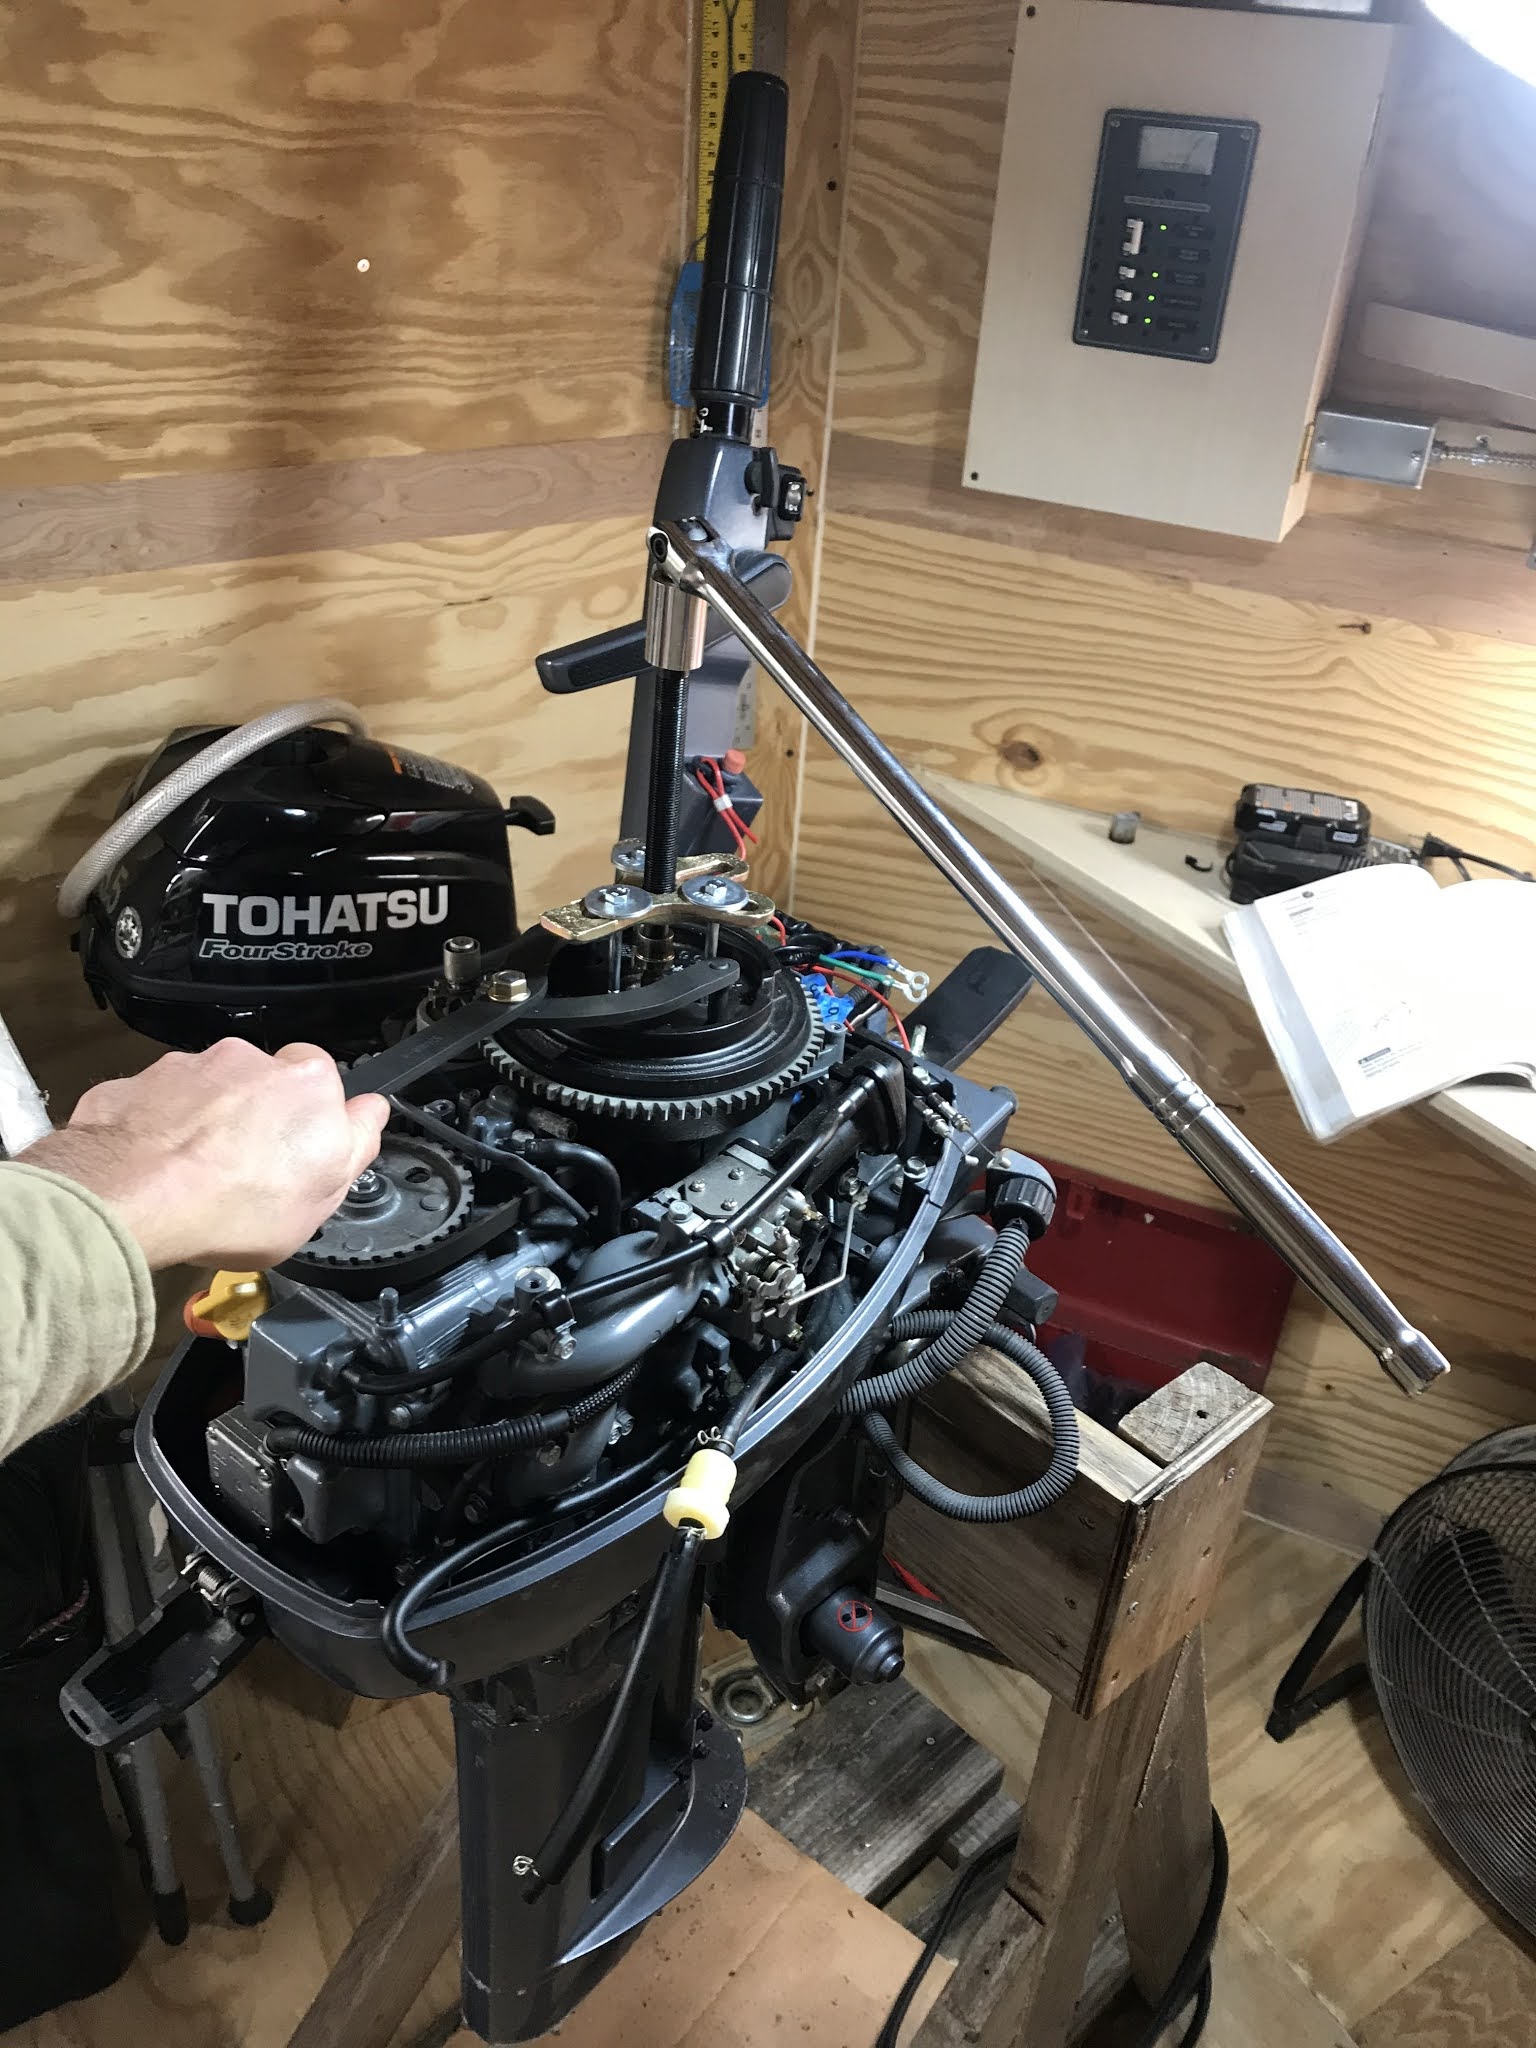
My first attempt at removing the nut for the flywheel on my Yamaha 9.9 High Thrust didn't go well. I needed more leverage, so I had to stop and go buy a breaker bar from the local auto parts store. Removing the nut was the first step in pulling the flywheel, a necessary job for anyone who wished to replace the timing belt.
These clamp-like pieces of metal were what held the leg of the motor to the gear-shift shaft. The shop manual wasn't helpful when the time came for me to reinstall them.
The rubber pads within had to be situated in a precise way.
I point to the markings that must be visible in order for everything to fit together correctly.
See all those notes in red and yellow in the shop manual? That's all the information that the writers of the manual should have included.
With the store-bought breaker bar and with the homemade one, which consisted of an aluminum fishing rod holder, I had enough leverage to get the nut off the flywheel.
Now, I used the breaker bar on the flywheel puller to . . . well . . . pull the flywheel.
Even with the breaker bar, this took a lot of muscle power. Eventually, with a sudden pop, the flywheel sprung free.
After I had pulled the flywheel, there were some obstructions that still remained.
I had to remove one of these coils to remove the existing timing belt. You can see the teeth of the belt in the top left corner of the photo.
Even though I had replaced the thermostat about two years before this time, I went ahead and installed a new one. Why not, after all this labor?
In the picture above you see me loosening the screws on one of the coils.
Here, I am installing the new thermostat. It's not necessary to remove the flywheel to do this job. You can see the new timing belt easily in this picture.
I always replace the internal fuel filter each year. It's easy to access simply by removing the cowl.
Reinstalling the linkage for the throttle was not easy, primarily because it's in a tight space. I wrongly inverted the two steel cables. I would only find this out later when I cranked up the motor for the first time. More on this below.
Here, I am reinstalling the power tilt motor.
What a mess of wires! I never would have gotten everything back together correctly if I'd not numbered every wire.
The old impeller showed some wear and tear, but it was still intact. Nevertheless, I installed the new one I had purchased.
See the large, end-cutting pliers in the foreground? I had to use these to remove the Woodruff key from the bottom of the driveshaft. You can see the half-moon shaped key near the end of the pliers. The Woodruff key keeps the impeller from slipping on the shaft. Without that tiny key the impeller would be useless and the motor itself would be useless.
I used an old dental tool that I had purchased at the local hardware store to clean some of the gunk out of the water pump.
Yamaha recommends replacing the water pump housing every few years. I had never done this, so I did it at this time.
Annually, I install a new inline fuel filter in the portable gas tank for the Yamaha.
When I at last had gotten the Yamaha back together, I cranked it up to make sure it would function properly. If you missed Part II of this article, you should know that I disassembled much of the motor to replace the oil filter, which resides inside of the oil sump. As soon as I cranked the motor, it started running at full throttle. It was then that I realized I had reversed the throttle cables when reinstalling the linkage.
This is a can of spray paint. I ordered this because I still had another job to do on this motor - address the corrosion on the skeg.
I began by cleaning the skeg and the lower unit and the leg with TSP to remove dirt, oil, and other impurities.
Despite the fact that I kept the skeg tilted up out of the saltwater, it still would make contact with the saltwater due to the general turbulence of Charleston Harbor.
I decided to use marine epoxy putty for this job rather than the RAKA epoxy I used for all other jobs on this boat.
The putty was forgiving, and I was able to fill in many of the pock marks with little effort and no mess.
I would later shape the fully cured epoxy with a grinder and then paint everything with the special Yamaha motor paint. It looked almost brand new.
When my final order from Oznium arrived, I got everything ready so I could install them in the galley of the boat.
By this point I had finished varnishing the mahogany backers that I described in my earlier posting.
These lights made a big difference in the galley. Compare them to the Bebi Electronics LED light near the electrical panels. I'll say again, though, that I still use the Bebi Electronics light more than the Oznium LEDs. Why? Because the warm yellow light of the Bebi Electronics light is usually just right when making coffee and eggs in the morning or cooking some meal at night. Every once in a while, however, it's nice to light up the entire area for some task.
See the glossy teak trim around the companionway? This was another project that I undertook during this lengthy yard period. During my lengthy refitting of
Oystercatcher, the companionway trim was one of the few parts of the boat that I had neglected. During this yard period, I scraped off all the old varnish, sanded down the teak to its natural honey yellow color, and then applied multiple coats of Epifanes high gloss varnish.
Here we see the mahogany paneled teak box that I described in an earlier posting. We also see the teak soap holder and teak binoculars rack that I had removed from the galley and treated with Australian timber oil. Now it was time to install these pieces.
This is a picture of the port side of the V-berth. Specifically, it's a picture of the mahogany backer for the switch I installed for the new Oznium LEDs. By this point I had stained and varnished the backer so that it would tie in with the rest of the stained and varnished mahogany.
The teak pole for the ensign now looked much better now that it had three coats of Australian timber oil on it.
The mahogany paneled teak box fit perfectly on the port side bulkhead. It would be a handy storage place for many important items.
Back in 2016, when I had constructed a new tiller out of white oak, I had fabricated a small aluminum plate for the bottom side of it. The purpose of this plate was to protect the wood from the aluminum rudder head on which it would normally sit when underway. You can see this 2016 aluminum plate on the left. It was so deeply scored from the rudder head that it was now almost in two pieces. My plan was to fabricate a replacement plate out a thicker piece of plate aluminum.
I used my SWAG table and Milwaukee Tools portaband for this job.
I deburred the piece and rounded the edges on my benchtop sander.
I normally give the white oak tiller about three coats of fresh varnish each year during Oystercatcher's yard period. This yard period was no exception. I remove the old seine twine annually during this process and then wrap the handle with new seine twine at the end.
Another annual seine twine ritual is the wrapping of the starboard side handrail with new seine twine. See the new spool of twine? Back in 2015, near the end of my lengthy refitting of
Oystercatcher, I had purchased the original spool of the same size. Thus, in 4.5 years time I had used that amount, mostly during the yard periods.
This is for the centerboard line, which runs from the mast to the winch near the cockpit.
I spent a couple of hours one afternoon cleaning up the newly welded pulpit and buffing the stainless steel.
When the pulpit was ready and the mahogany anchor roller platform was ready, I pulled out the butyl tape and spread it around the bases of the pulpit. Notice the wires for the nav lights coming out of the bottom of one of the bases. This butyl tape is the good stuff that Maine Sail sells on his website.
After I had reinstalled the pulpit, I reinstalled the mahogany anchor locker panel in the V-berth. Later, I reinstalled the anchor line by reaching through this handy port that I had installed back during my lengthy refitting of
Oystercatcher.
Another task that I performed around this time was the reinstallation of the nav light on the forward end of the pulpit. No pictures of that. You do, however, see the new anchor line. I had actually purchased this in the summer of 2019, not long after my buddy and I had returned from our trip down to Port Royal Sound and back. If you read Part I of this article, then you'll know that was when we ended up hard aground on a steeply sloped oyster bank. After that experience, we knew that it would be good to have an additional 200 foot line onboard other than the one spare 200 foot anchor line. Therefore, I bought this New England Ropes brand 1/2 inch nylon line to replace the original one of the same kind, and I made it the extra 200 foot line onboard.

This picture does not do justice to the beauty of this mahogany at the end of the varnishing process. I applied multiple coats of Epifanes high gloss varnish to these pieces, followed by two coats of Epifanes rubbed effect varnish. The rubbed effect varnish is much more pleasing to the eye for the mahogany inside of the boat.
I left the backside of the door finished bright. Some might ask, "Why varnish the back of a door, especially one for the lazarette?" My answer: "Because with enough humidity and moisture the mahogany veneer panel in the door will delaminate."
As far as the mahogany block for the motor mount was concerned, this time I would not be using epoxy to attach the aluminum plates to it. I never should have done that back during my lengthy refitting of
Oystercatcher. The wood obviously expanded and contracted and broke the epoxy bond with the aluminum.
This time I would use Dolphinite, an old school petroleum-based bedding compound that they still sell on the Defender website. I had worked with this stuff before on the tall ship,
Spirit of South Carolina.
I didn't get a picture of the mahogany and the plates at the time I reinstalled them, but I did snap this picture soon after I relaunched the boat. By this point all the Dolphinite that would ooze out had already oozed out. The great ooze lasted for about a week. Hopefully, this product will create an impermeable bed, which will prevent the widespread corrosion problems I experienced with the first step up.
A weekend or two before the relaunch, I performed another annual ritual - that of applying several coats of Collinite Fleet Wax on the mast. Afterwards, I reinstalled all the rigging, which I had kept in a room indoors since early Sept 2019. See the Ericson 25 rudder against the fence? That was one of the pieces I salvaged from the E25 that I had helped to cut up. See my story in Part 1.
On Feb 15, 2020, almost six months after I had hauled
Oystercatcher out of the water on account of the approach of Hurricane Dorian, she was finally ready to return to the saltwater.
Oystercatcher slipped right off the trailer and into the water without any issues. My buddy said she was happy to be back in the saltwater.
It's always a strange feeling when I get
Oystercatcher back on the trailer and next to my house. She seems so still and dormant whenever I first climb aboard her. This time, she had been out of the water for such a long time that I had temporarily lost the sense of the way she truly feels when she's in her element. As my buddy and I left the boat ramp dock and entered the open water it was nice to feel her amidst that eternal motion of the saltwater once again.
There are always a number of tasks to perform after I get
Oystercatcher back to her slip at the marina. One of them is that of reconnecting all of her mast wires to the large terminal block on the bulkhead. I did not take a picture of that job. I did, though, take one of this one. Back when I had been installing the Oznium LEDs in the V-berth, I had crossed one of the wires and blown a fuse in one of the DC electrical panels. Here, I'm installing a new fuse.
After almost 5 years the dock lines that I had purchased in 2015 at the end of my lengthy refitting of Oystercatcher, were starting to show a lot of wear and tear. I purchased these replacements from Defender. I would end up, however, getting more life out of those original dock lines for quite a while, using these for doubling up the lines when the weather was up.
I took this picture one night at some point after I had relaunched the boat.
Fortunately, I got the boat back in the water before all of the lockdown procedures began in early March 2020 from the spread of the coronavirus.
Oystercatcher would become my coronavirus getaway. I would spend the night aboard her every weekend. Notice the teak washboards in the companionway. I used these for quite a while until I found the time to repair the air conditioner box.
If you've read the other parts of this article, you'll know that I had done some work on this air conditioner box back in the fall of 2019.
After I epoxy-coated and sanded these pieces, I glued them together with epoxy.
The aft panel of the air conditioner box was in bad shape appearance wise, but despite the many cracks in its surface it had no rot whatsoever.
I used quite a bit of RAKA epoxy on this job. I thickened it to the consistency of peanut butter with colloidal silica.
Before I would thicken the epoxy, I would wet out the surfaces of the bare wood, and I would wet out the cracks in the panel. I used the leftover thickened epoxy from the repair job to fill the cracks in the panel.
It took a lot of sanding to get all that cured epoxy to become nice and smooth.
While I was at it, I took the time to disassemble and clean the air conditioner that I had been using since 2015. I had gotten this thing online from Kmart during a Black Friday sale for $100. Actually, I had gotten for free, because they sent me a crappy looking one with bent fins and dust all over it. I think it was one they had displayed in store somewhere. At any rate, I complained and they refunded my money and told me to keep the air conditioner. It was still running great, but it did need some good cleaning now in the spring of 2020 after these years of saltwater service.

At the same time I was doing this work I was also working on the transom panel that I had constructed for the purpose of preventing water from entering the cockpit in the event of another grounding such as my buddy and I experienced near Port Royal Sound.
I used Pitthane two-part polyurethane on the box and the panel. This is the same paint I had used on the box when I had originally painted it. This stuff is incredibly tough and much cheaper than "marine" polyurethane. I gave the entire box two fresh coats of Pitthane.
After I had given the panel two coats of Pitthane, I reinstalled the aluminum tracks. I used leftover butyl tape to help prevent water intrusion into the center of the plywood.
The completed panel. I would take this to the boat and stow it in the starboard cockpit locker, ready for use whenever necessary.
The air conditioner box looked brand new when I got it back in place aboard
Oystercatcher. Some might consider this box an annoying obstruction, but it's not. It's easy to step on it and step right down into the galley of the boat. It's nice to have in the cockpit. It's a convenient table that I use every day.
The work on a sailing vessel never ends, at least for those who wish to main her well, but despite this truism, I was glad that I could call this lengthy yard period done and spend some well deserved time aboard her, free of the restrictions under which so many of us lived during the covid crisis of 2020.


No comments:
Post a Comment