Showing posts with label Garhauer. Show all posts

Anchor, Chain Locker, and Anchor Roller, Part 3, Analysis, Part III

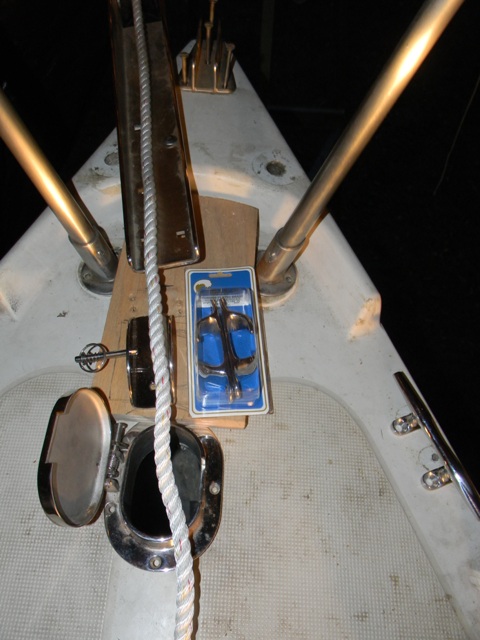
The components of the new anchoring system loosely fitted into place
Having completed my thoroughly unexpected and thoroughly unpleasant digression to repair the deck core at the bow of the boat, I could now continue to determine where I would install the various components of the new anchoring system that I had purchased for Oystercatcher, my Ericson 25. The steps to reach some conclusions on this layout issue out are the subject of this posting.
You'll recall from the previous posting that I had cut the hole for the new oval chain pipe that I would install over the chain locker. You'll also recall that I had decided to install a block of wood on the centerline of the deck and that this block of wood would serve two purposes. On the one hand, it would provide a foundation for the anchor roller; on the other, it would conceal the hole that I would soon patch in this area forward of the chain pipe. This was the hole where the old ventilation cowl was located. In the picture below, the mock-up block of wood is concealing this hole.
I knew that I would need to custom-cut this block of wood so that it would fit into this space. Below you see the arc that I have scribed at its forward end.
Below, we see the mock-up dry-fitted into place.
Now it would be easier for me to figure out where exactly I needed to install the Garhauer brand anchor roller and the Lewmar brand chain stop.
The picture below illustrates clearly why the real block of wood would need to be about twice as thick as the mock-up. You can also tell from this picture that I had not yet fully determined how I would terminate the block of wood on its aft end. Notice that in this picture the wood encroaches on the flange of the chain pipe.
You'll notice below that I have scribed an arc along the aft end of the block to see whether a a block of wood in this shape would be both practical and visually appealing.
My work with all of these components was not as easy as it might seem. It was hard to hold the anchor roller in one hand and a chain stop and a pencil in the other. I also, of course, had to take into account the anchors that would hang on this roller. The roller had to be positioned far enough forward so that the anchors would not come into contact with the hull of the boat, but the roller could not be positioned too far forward; otherwise it would present more opportunities for trouble in terms of the fouling of the anchor rode on the roller when the weather was up.
I had purchased two different anchors at two different times, taking advantage of the price matching that West Marine used to do. First, I purchased a Lewmar brand Delta plow anchor. This 22 pound anchor was rated for boats in the 25 - 41 foot range. My friend with the Stamas 27 powerboat (that I discussed in the previous posting) had success with this type of anchor in the pluff mud of the Carolina Lowcountry, so I figured I would too. This anchor fit well in the 24 inch Garhauer AR-30 anchor roller that I had earlier purchased.
Below we see my friend's Stamas 27 as he launches it from his trailer for camping trip we made out to Capers Island, South Carolina, an uninhabited island north of Charleston. At the bow is a Delta plow anchor, at this moment resting on its side. I believe he had positioned it this way on the deck to prevent it from getting snagged by the bow roller during his launching of the boat.
My thinking on the size of my Delta plow anchor changed when my friend and I later made a weekend trip out to the inlet at Morris Island, South Carolina for the annual campout for the Friends of the Morris Island Lighthouse. This lighthouse, long ago abandoned, now sits in the water off Morris Island, an uninhabited island at the mouth of Charleston Harbor. At any rate, there was a low pressure system off the coast of Florida. On the second night we were out there at the Morris Island Inlet the wind picked up to 30 knots, and many of the boat owners spent a sleepless night setting and resetting their anchors because their anchors simply would not hold. My friend's Stamas 27, which was similar in weight to an Ericson 25, held fast, but only because he'd anchored his boat in a nearby tidal creek. All of those in the inlet were harried by the unrelenting wind.
As soon as I got back home I began to look around for a heavier anchor. I had heard good things about the Lewmar brand claw anchor, and I found a 33 pound one for sale at an incredibly low price on the Defender website. The local West Marine matched the price, and I walked out of the store with this weighty monster in one hand and my Garhauer anchor roller in the other. Yes, this 33 pound claw fit into the Garhauer roller, but just barely. This claw was rated for boats in the 36-40 foot range. Everyone knows that these specs change when you factor in high winds. I had seen too many persons at Morris Island spend a miserable night fighting the wind. I didn't want what they had on any night I might spend on my Ericson 25.
I decided that I would make the 33 pound claw my primary anchor and the 22 pound plow anchor my secondary one. Fortunately, both anchors fit well on the anchor roller in the spot where I hoped to install it on the bow. In other words, neither posed a threat in terms of damaging the hull. A friend stood on a ladder and held the anchors in place while I knelt on the bow and held the roller in place. With my one free hand I quickly marked the spots where I needed to drill the holes for the bolts that would hold the roller in place.
The carriage bolts for the anchor roller were 5/16 inch in diameter.
I decided that I would drill only one hole. This one hole would allow me to insert one of the carriage bolts and then pivot the roller here and there slightly until I figured out the best spot for it to be.
The peak of the bow through which I drilled the hole was over two inches thick. It appeared as if Ericson had sandwiched a block of wood between two thick layers of fiberglass.
As soon as I drilled the hole I went below and looked up into the chain locker. I had done a lot of guesswork in attempting to determine where this hole would be. Fortunately it appeared that there would be enough room not only for a washer and nut on this bolt, but also on the next one even farther forward than this one.
With this one carriage bolt loosely inserted into this first hole, I could now freely experiment with various arrangements at the bow. I still had not quite figured out where I would install the chain stop and how I would cleat off the rode when the anchor was deployed. Below you see that I am using the 1/2 inch nylon rode in place of chain to make some decisions about the chain stop. I had no desire to use the heavy chain for this experiment.
Ideally, I wanted a cleat between the chain pipe and the anchor roller.
This was similar to what my friend with the Stamas 27 had. He used one of his two cleats when setting the anchor. He had the luxury of lots of space at the bow. I did not.
I considered the set-up below, but I was concerned that there was just not enough space for me to make proper use of the cleat.
This was when I began to think about using a chock to guide the nylon rode to one of the cleats on the port or starboard sides of the bow.
I also, however, considered installing a Samson post, also called a mooring bit or bollard. I knew someone else who had a set-up with one of these pieces of hardware.
I looked at the dimensions online for the Whitecap brand and the Sea Dog brand Samson bits. This was the only way I could determine whether one of these would fit in this space. Above we see the Whitecap brand Samson post available from Defender.
I liked the Whitecap Samson post because it seemed to be of a higher quality.
I marked the wooden block mock-up to get a better idea of how the Samson post would fit, or not fit, in this space.
Eventually I concluded that there just wasn't enough space for the Samson post. With about 18 inches more space between the anchor roller and the chain pipe it might have worked.
Having abandoned this idea, I returned to my previous idea of using a chock to lead the nylon road to one of the cleats at the bow. This was the most workable solution. Now I needed to create the real wooden block that I would place here at the bow. That would help me figure out exactly where I needed to locate the chain stop and the chock.
This ends this posting on how I reached some firmer conclusions regarding the set-up for my new anchoring system on Oystercatcher, my Ericson 25.

Anchor, Chain Locker, and Anchor Roller, Part 2, Analysis, Part II

The Garhauer anchor roller, the Suncor chain pipe, and the southern yellow pine mock-up
Having decided on the major hardware that I needed for the new anchoring system, and having decided on a general layout, I now needed to figure out some of the specifics about this layout. Primarily at this point I needed to figure out where exactly I should locate the chain pipe, because this would determine the specific location of the anchor roller and the block of wood, insofar as I wanted there to be a fair lead between the chain pipe and the roller. The issues surrounding my choice of the specific location for the chain pipe on Oystercatcher, my Ericson 25, is the subject of this posting.
You'll recall from the first posting that I wanted my set-up to look generally like the set-up of the Ericson 25 owner in Alaska with whom I had conversed on the subject. We see his boat below. He purchased a large anchor roller and a chain pipe. He canted the large anchor roller to port so as to avoid the stemhead and also the two legs of the pulpit. He secured the anchor roller both to the stem and to a block of teak aft of the stem.
As I said, my focus in the present posting is on my placement of my chain pipe on my boat, Oystercatcher. The first question I asked myself was whether I should orient the oval chain pipe fore to aft, such as we see in the photo above, or port to starboard, such as we see in the photo below. This photo that we see below is of my friend's set-up on his Stamas 27 powerboat. His port-to-starboard orientation of the chain pipe made a lot of sense to me, because it allowed for the fairest lead possible from the chain pipe to the roller. Why? Because these hinged-lid chain pipes, such as you see above and below, both have cutouts in their sides for the chains. This is what allows you to shut the hinged lid fully without it being impeded by the chain.
With this in mind, I oriented my chain pipe in a port-to-starboard fashion and created a mock-up block of wood out of southern yellow pine. This mock-up was not as thick as the real block would need to be, but this at least gave me some sense of what the real block could look like. The real block would serve two primary purposes. On the one hand it would provide part of the foundation for the large, Garhauer anchor roller that I had purchased; on the other, it would help conceal the hole for the old ventilation cowl that I had earlier removed. You'll notice that by necessity I needed to orient the block of wood fore-to-aft along the centerline of the boat. Otherwise, I would not be able to conceal the fiberglass patch that would exist where the old hole for the ventilation cowl had been located. This fore-to-aft, centerline orientation (as opposed to a canted-to-port orientation) did not bother me one bit, because, as you will recall from my first posting, I had striven to find some solution to my anchor-roller location problem that would allow for a centerline orientation. This did not mean that I now planned to orient the roller itself along the centerline, but that I now saw that I could perhaps fool the human eye into perceiving the anchor roller, canted to port, in a more pleasing way. In short, I was now thinking that a fore-to-aft, centerline orientation of the block would downplay the somewhat awkward appearance of the canted-to-port orientation of the anchor roller.
Things seemed to be coming together quite nicely as I continued to think my way through this problem. Yes, now was the time to patch that old hole for the ventilation cowl so that I could start to move forward with my plans for the installation of the chain pipe and the creation of the wooden block.
In my first move toward patching this hole. I removed the flange that surrounded it.
The previous owner had installed this flange with a haphazard assortment of screws and washers. He actually used some old terminals from some wiring job somewhere as washers for the nuts.
This sloppy work was a good indication of the major problem that I was about to discover.
The balsa deck core around the hole was completely rotten due to water intrusion in this area.
This meant that to repair this deck core I would either need to cut away the fiberglass of the deck or cut away the fiberglass underneath the deck to get to the rotten core. I opted come in from below.
With my Dremel in hand in the V-berth of the boat, I reached up into the chain locker and began to remove portions of the fiberglass beneath the deck. Fortunately, it appeared that the water had entered through the 12 volt DC receptacle forward of the hole. It had then crept toward the large hole where it perhaps dripped down into the chain locker. This appeared to have prevented the water from creeping farther aft toward that part of the foredeck where I planned to install the new chain pipe. That was good.
Before cutting out any more fiberglass from the underside of the deck, I thought it would be a good idea to go ahead and cut the hole for the new chain pipe. The more I had thought about it, the more I liked the fore-to-aft orientation of the chain pipe. It just looked so much better this way on this boat. I had seen countless other boats with the fore-to-aft orientation, so I figured that this orientation could not be that bad in terms of the fair lead of the chain and rode from the chain pipe to the anchor roller.
Fortunately, this plug revealed that the balsa core indeed was not rotten in this area of the foredeck aft of the large hole.
There was some discoloration, but the core fully resisted my pokings and proddings with a putty knife.
I really liked the fore-to-aft orientation of the new chain pipe.
I was limited in terms of the distance I could locate the chain pipe aft of the large hole. If you look closely, you can see a portion of the bulkhead at the top of the picture below. This small bulkhead separated the chain locker from the V-berth. To put it simply, if I had situated the chain pipe farther aft, then I would have had to store the chain in the V-berth instead of the chain locker.
My work in the tiny confines of this chain locker was horrible. This was the most difficult project I tackled on this boat, and it was made all the more difficult by the fact that it was an unexpected project. On top of that, it was August in the Carolina Lowcountry. In this posting I'm just touching upon part of the story, especially as it relates to the chain pipe. For a thorough description of the actual repairs that I made, see my earlier article, "Deck Core Repair, Chain Locker," http://www.ericson25.com/2013/01/deck-core-repair-anchor-locker.html
While I was at it, I went ahead and pulled the bow cleats, since these too were part of the anchoring system as I envisioned it.
The stainless steel screws and the aluminum cleats were hopelessly corroded. Try as I might to remove the screws from the cleats after I had removed them from the deck, I never succeeded.
I eventually discarded these cleats and ordered two new Schaefer brand stainless steel cleats from Defender in Connecticut.
I constructed a plywood replacement for the rotten balsa core that I had removed from the underside of the deck. This plywood was exterior grade and 3/8 inch in thickness, just like the 3/8 inch balsa core. I cut slits in one side of the plywood to make it easier for me to force the board to conform to the curvature of the deck.
I used RAKA brand epoxy for the project, as I did for many other projects in the refitting of Oystercatcher.
Working with a friend, I glued the plywood into place on the underside of the deck. Screws pulled the plywood up snug against the deck.
After the epoxy had cured, I removed the screws and applied cloth to the underside of the plywood. This created a fiberglass skin that overlapped with the existing fiberglass skin.
This abbreviated summary, like so many abbreviated summaries you read on the various sailing forums, makes this job seem like it was a snap. It was, in fact, anything but that. It was a hellish job that I never want to do on any boat ever again.

Now that this unpleasant and unexpected, but entirely necessary sub-project was complete, I could finally return to my primary goal - that of creating a new anchoring system for Oystercatcher, my Ericson 25.