|
| The mahogany anchor platform dry-fitted into place |
Having reached some conclusions concerning the placement of the various components of the new anchoring system, it was now time for me to discard the mock-up piece of wood that I had used to assist me in reaching some of these conclusions; likewise, it was now time for me to construct the real piece of wood that would rest at the bow. This piece of wood needed to be some two inches thick, in order for it to correspond to the raised fiberglass shelf at the peak of the bow. This piece of wood also needed to be of a sort that was appropriate for the marine environment. I had a scrap piece of mahogany from my earlier construction of a new companionway hatch. It was this piece that I selected to use for this anchoring system project. In my first posting on this project I spoke of anchor platforms, that is, those planks of wood on some boats that project outward, over the bow. This block of wood on my boat would not project outward in the same way that anchor platforms on other boats do. Nevertheless, it would resemble them. For this reason I came to call this block of wood my anchor platform, and from this point forward I will refer to it in that fashion in this series of postings on this subject. How I constructed this anchor platform on
Oystercatcher, my Ericson 25, is the subject of the present posting.
You'll recall from my previous posting that I had constructed a mock-up that was stubby in appearance. Its aft end terminated on the forward end of the chain pipe.
In this regard, this mock-up closely resembled the set-up of the Ericson 25 owner in Alaska. As I said in two previous postings, this was the model of sorts that I consulted in the creation of my own set-up. You might remember me saying that one thing I did not like about this Alaska owner's set-up was that it was cramped in appearance. In other words, the block of wood looked like it was encroaching on the chain pipe. Moreover, it appeared as if there was not a fair lead from the chain pipe to the anchor roller, since the roller and the chain pipe were at two different heights.

There more I thought about it, the more I realized that my mock-up, despite the fact that I had oriented it in a more visually pleasing fashion along the centerline of the boat, was just as awkward looking. My problem was that I could not think outside the confines of the chain pipe. I looked at the chain pipe as an obstacle that I could not and should not overcome. Suddenly, however, I realized that my set-up did not need to be confined by the chain pipe. It could, in fact, incorporate the chain pipe into it. I had cut an oval hole in the deck to accommodate the chain pipe. Why not also cut an oval hole into the block of wood above it? That was what I started thinking, and that changed everything.

I began by using the mock-up as a guide for scribing an arc at one end of the piece of mahogany. I did not make marks along the sides of the mock-up. I did not want to make the piece of mahogany more narrow than it already was. I wanted all the mahogany I could get, because this would provide a better foundation for the anchor roller.
After I had scribed the arc, I marked the centerline of the mahogany.
The arc that I had scribed was not clean and symmetrical. After all, I had based it upon a hastily fashioned mock-up. I searched the house far and wide for some object whose curvature matched the arc that I had scribed. A friend was visiting at this time, and at this time he'd gotten into stir-fry dishes. He grabbed his well-used wok. It worked just right. Do I care about using household objects such as this one in fashioning one thing and another? Not a bit. I learned to improvise like this long ago when messing around with power tools as a youngster.
One thing that I had never done when I constructed the mock-up was to bevel its edge so as to take into account the beveled edge of the shelf against which it would be placed.
I made this cut with my Makita jigsaw.
The angle of the bevel in the mock-up seemed to correspond well to the angle in shelf.
For the cut that I would make in the mahogany, I made sure to install a new blade. I selected a Bosch T-101BR Reverse Cut blade. This would make for a clean cut through this dense wood.
I made sure to make the cut in one, unhalting sweep from port to starboard. This was the easiest way for me to ensure that the cut would be smooth and consistent. Starting, stopping, and restarting can cause a jigsaw blade to walk, especially when making a beveled cut such as this one.

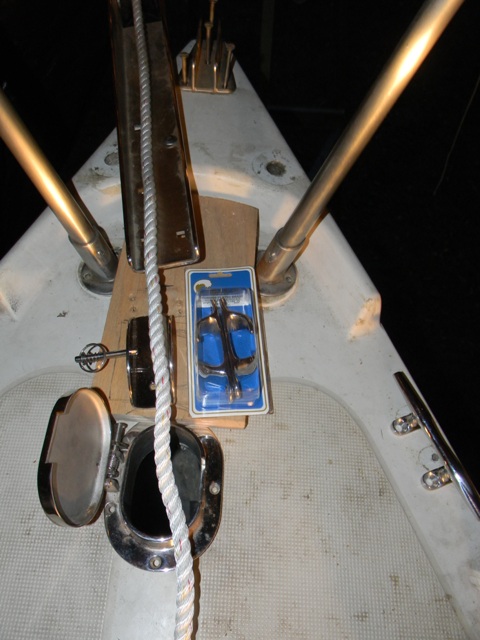
Out on the boat, I dry-fitted the mahogany into place. At this time I was not sure whether I should allow this wood to remain at its existing length or whether I should cut it shorter. If I left it as it was, there would be about 8 inches of excess mahogany aft of the chain pipe. I didn't really need this much, but this excess amount made the entire piece look just right. My friend and I talked back and forth about the pluses and minuses involved, and ultimately the consensus was that the full piece of mahogany was preferable. It just looked so much better. There was something about the proportions of it relative to the bow of the boat. Moreover, the excess on the aft end might one day be a useful foundation for some other piece of hardware such as a pad-eye for the securing of some object to the foredeck.

Two major obstacles that I had to overcome in the creation of the mahogany anchor platform were the two forward legs on the pulpit. With the mahogany being the width that it was, I would need to create some cutouts on the port and starboard sides so that this piece of wood could fit in this space. I used cans of food to help me get an idea of the size of the cutouts that I needed to create.
I decided that it would be much easier to figure all of this out, if I removed the stainless steel bases from the legs of the pulpit.
One of the challenges that I faced in the creation of these cutouts was that the legs were not straight up and down, but angled. To keep the cutouts from being excessively large and awkward looking, I needed make the cutouts angled as well. I first made some cutouts in the mock-up. I used these to gauge how large I should make the cuts on the topside of the mahogany.
I intentionally started small so that I could work up to larger cutouts. Better to remove small amounts of material at a time than too much at once.
The cut on each side was tricky. I had set the Makita jig saw to cut at an angle. This allowed me to make the top of the cutout small and the bottom of the cutout large. The cutout, in short, was wedge-shaped. Additionally, it was curved. Both of these things made this cut tricky. The burn marks are a testimony to the friction generated by the blade in these tight quarters.
The first cutouts were not as large as they needed to be.
Therefore, I made two more wedge-shaped cuts on both sides.
These new cutouts were the right size. When I tried them out on the boat, they fit well with regard to the stainless steel bases for the legs of the pulpit.
My dry-fit of the mahogany at the bow of the boat revealed that I needed to trim some material from the forward end.
This helped.
The forward end of the mahogany now fit more snugly against the shelf, but the fit was still not perfect.
I was worried that if I continued to attempt to remove small amounts of material from the forward end of the mahogany with the jigsaw I would ruin the nice, clean lines of the curve that I had cut into this piece of wood.
A power sanding tool would not do the trick. I knew that from trying to reduce mahogany by sanding in the past. This wood is just too stubborn. That's when I hit upon the idea of using an angle grinder. This tool worked just right. It allowed me to make very fine adjustments to the shape of the wood.
After multiple trips back and forth to the boat, I finally got the mahogany to fit the curvature of the shelf like a glove.
My work on the forward end of the mahogany had the unintended consequence of altering the fit of the stainless steel bases on the port and starboard sides of the wood. Consequently, I had no choice but to make the cutouts even larger on the port and starboard sides.
Despite all my work, the mahogany still did not fit as well as it needed to fit around the stainless steel bases on the port and starboard sides. At issue were the flanges on the stainless steel bases. I needed to make room for these on the bottom side of the mahogany. In the picture below, you'll see that I have turned the mahogany upside down, and I have scribed and arc with a can of Pettit mahogany stain.
Back at the cut table, I created a jig out of a scrap piece of pine.
I clamped this jig to the underside of the mahogany.
With my router in hand, I removed about 3/4 inch of material from the underside of the mahogany.
These semicircular routed sections, as I said, would provide the necessary space for the flanges of the stainless steel bases.
Back on the boat, everything fit just right.
There was plenty of room for the flanges on the underside of the mahogany, and there was plenty of room for the legs of the pulpit on either side of it.
This was a good start, but I still had a lot of work to do in terms of shaping this piece of mahogany to a finished state. I needed to shape the underside to account for the camber of the deck; I needed to cut the hole for the chain pipe; and I needed to figure out where to put the chock and the chain stop. Before I could do all of this, however, I needed to patch some old holes in this area of the bow.
This ends this posting on the initial steps I took toward the construction of the anchor roller platform for
Oystercatcher, my Ericson 25.