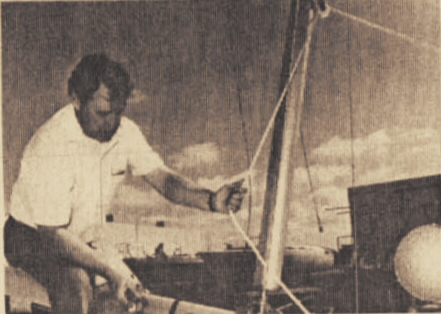
|
| The mast, fully stepped |
The Ericson 25 was designed and marketed as a trailerable cruiser. There are several things that a boat must possess in order for it to be trailerable, and thus capable of being launched and retrieved by means of a trailer at a boat ramp. One of these is a reliable mast-stepping system. Without such a system, the owner is at the mercy of a boatyard, with its busy schedules and expensive cranes. Most Ericson 25s possess an original mast-stepping system, and if they do not, they can be modified to possess one. Whether or not the original Ericson 25 mast-stepping system or a newly-created one is a reliable system, however, is another matter. Much of its reliability depends upon the condition of the rigging and other equipment. Perhaps more important are the steps that the owner follows from the beginning of the mast-stepping process to the end. In this article I describe the steps that I myself have followed, and in some instances created, in the stepping of the mast of
Oystercatcher, my Ericson 25. I do not claim that this is the only way or the best way to step the mast on this boat, but I will say that my own approach is more clear than the one originally set forth by Ericson Yachts in the pamphlet, "Raising and Lowering the Ericson/25 Mast."
I will begin by discussing the basic equipment and rigging that the boat must possess before you can step the mast.
First, you must have a mast tabernacle, or a mast hinge (that serves as a substitute for the original Ericson 25 mast tabernacle). In the picture below, we see an original mast tabernacle.
Here we see a mast hinge. For more on the tabernacle and the hinge, see my article, "Spars, Mast Hinge."
Aside from the tabernacle or the hinge, you need a secure masthead, through the blocks of which at least one good halyard must be reeved. I suppose that you could use one of the original, wire-rope halyards, but I cannot say for sure. I replaced my original, wire-rope halyards with all-rope halyards. For more on this, see my article, "Rigging, Running, Wire-Rope Halyard to All-Rope Halyard Conversion."
You need a cleat on the side of your mast. You use one of these cleats to secure one end of the halyard. It's important to use a cleat on the side of the mast opposite the mast winch rather than one on the same side as the winch. You do not want the halyard to interfere with your use of the mast winch when stepping the mast. This will become more clear as we go along.
Next, you need a boom that is in good condition. This boom will be used as a gin pole in the stepping of the mast. The word
gin is an abbreviated form of the word
engine. A gin pole, whether on a sailboat or on a construction site, is a boom that provides leverage in the lifting of a heavy object.
Through the outhaul eye in the end-cap on the aft end of the boom you need to install a shackle. Just before you step the mast, you will join the other end of the halyard to this shackle by means of a bowline.
You also need two tangs on either side of the aft end of the boom. The tangs are for the mast-stepping bridle, or boom-guys, as they are also called. The bridle prevents the mast from swinging to port and starboard while you are stepping the mast. For more on these tangs, see my article, "Spars, Boom, Hardware, Removal and Reinstallation."
You also need four quick-release clevis pins for the mast-stepping bridle.
You use two of the quick-release clevis pins to join the aft ends of the bridle to the tangs. For details on the bridle, see my article, "Rigging, Standing, Removal and Replacement, Part 2."
You also need link plates in your upper shrouds. For more on these link plates, see my article, "Rigging, Standing, Removal and Replacement."
It's to the holes in the link plates that you join the forward ends of the mast-stepping bridle. You use the other two quick-release clevis pins for this.
Next, you need main sheet blocks and a main sheet that are in good condition.
Additionally, you need a mast winch that is in good condition. You'll use the main sheet and this winch in the stepping of the mast. In the picture below, you see me completing my reinstallation of the mast winch after my disassembly and cleaning of it. For more on this, see my article, "Winch, Barlow 16, Disassembly, Cleaning, and Reassembly."
Finally, you need to have factory original mast crutches or mast crutches that you yourself have produced. Below we see one of the factory original crutches for the bow of the boat.
Here's one of the factory original mast crutches for the stern of the boat.
Below we see an Ericson 25 with its mast resting on the factory original mast crutches. For more on these factory originals, see the article, "Ericson 25, Mast Crutches."
Since I did not have factory original mast crutches, I had to produce my own. Below, we see my solution for the bow.
Here we see my solution for the stern. For more on these mast crutches, see my article, "Spars, Mast Hinge, Part 2, Analysis II."
Regardless of type of mast crutches that you have, you need to be able to roll your mast in a forward direction when you are in the process of stepping it. For this reason, a good roller is a must.
If you possess all of the above items, then you are ready to step the mast according to the method that I here describe.
This method is similar in some ways to the method that Ericson Yachts described in the original pamphlet, "Raising and Lowering the Ericson/25 Mast." For this reason, I will make reference to this pamphlet during my discussion, providing clarification and alternatives where needed.
I have one word of caution before I begin, since this was not included in the original pamphlet: always make certain that your boat is clear of any power lines that may be in the vicinity. Owners of various trailerable sailboats have been electrocuted while stepping and unstepping their masts.
Step 1 in the original pamphlet is as follows: "Disconnect all lines holding the mast in the crutches." It then provides a picture of a guy apparently easing a line on a cleat.
The above advice is obvious and unnecessary. More helpful would have been advice regarding the rigging. When you trailer your boat, you want to keep the rigging secured to the mast. Otherwise, it will spill all over the deck and possibly be dragged along the side of the trailer. Below is a picture of my mast with the rigging secured in numerous places along the length of the mast. My friend and I are about to pick up the mast and walk it over to the boat. This is a two-person job, just like the stepping of the mast is a two-person job. The original pamphlet gives the impression that you can do this alone. While this might be possible (and I stress here the word
might), it certainly is not smart.
Let's pretend that in the picture below the boat is sitting in the parking lot near a boat ramp. The first thing you want to do (along with your helper) is to untie all of the lines that hold the rigging to the mast. This will cause the rigging to droop down onto the deck. It will look like a big mess, and it can be, if you don't take a few minutes to make sure that the rigging is not fouled on itself or on a piece of deck hardware. Also, if you have a roller furler, and if you have a second helper on the ground, now would be a good time to hand the furling drum down to this person. The furling drum becomes an annoying obstacle on deck as you move the mast forward in the roller.
Step 2 in the original pamphlet is as follows: "Grasp the mast firmly, lift it from the stern crutch, and roll the mast forward on the bow crutch roller, lifting the mast light over the roller." Here's the picture that accompanies this part of the instructions:
For some reason the original pamphlet only mentions the steaming light and does not mention the spreaders. I do not have the original mast crutch, but an Ericson 25 owner who does have one has told me that he has to pick up the mast not only for the steaming light but also for the spreaders. This is certainly true for my mast crutch. In the picture below, my friend and I are rolling the mast forward, making sure that the rigging does not become fouled on itself or on any deck hardware.
The third person - the Admiral - was taking pictures. Otherwise, she would have stood beside the boat and held the furling drum as we rolled the mast forward.
Despite our best efforts, some of the turnbuckles and toggles became fouled on the deck hardware as we rolled the mast forward. We would pause, correct the problem, and then begin rolling the mast forward again.
The fixed mast crutch on my trailer is definitely convenient. I never have to worry about whether or not the crutch is secured firmly to the deck, and I never have to worry about stowing the crutch somewhere in the tow vehicle after I have launched to boat. It does, however, make things more difficult when stepping the mast. Notice in the picture below the spreaders are still several feet from the crutch and that the mast is already at about the halfway point in the crutch.
The spreaders in the picture below have reached the crutch, and the mast is now well past the tipping point.
One of us walks out as far as possible on the bow, with his foot on the anchor roller, while the other holds the end of the mast.
While the person on the bow lifts up on the mast, the person behind him pushes the mast forward, making sure that the mast does not fall down on the tow vehicle. This takes some effort, because the mast is far beyond being balanced. Some 2/3 of it is forward of the crutch.
Step 3 in the original pamphlet is as follows: "When the base of the mast reaches the mast step, force the mast down into the step, and insert the pin through the mast and step." The picture below is provided. Notice how the man is obviously putting his weight on the mast as he pushes down. This is not an easy task, and you'd better make sure that you have your pin handy and that you can insert it all the way through the holes in one fluid motion. This is yet another reason why the prudent owner will have a helper present to do one of these tasks - either forcing down the mast or inserting the pin.

Ericson was right to offer the following warning in this section of the instructions: "Caution: Do not relax your hold on the mast until the pin is secured through the step - to do so would allow the mast to fall on the vehicle in front of the boat." The picture below says it all. By this point we have fully installed the pin in the mast hinge. That's why one of us can relax while the other installs the cotter ring on the end of the pin. The Admiral took a short break from her picture taking in order to receive the furling drum from us and place it on the ground.
In the picture below we see get a good view of the mast, the crutch, and the mast hinge with the first of two pins installed in it. The picture above illustrates the same step in the process.
Notice in the picture above and below that the forward hatch is not in place. If you've read my multi-part article, "Spars, Mast Hinge," then you'll know that even though I built a new 1.5 inch mast step for this hinge, the mast-step/hinge assembly was still not as high as the original mast tabernacle. For this reason, the forward hatch would always be in the way whenever I stepped and unstepped the mast. Sure, it would be better if I did not have to remove it, but it only amounts to removing two cotter rings. It takes less than a minute to take off the hatch and put it down below in the main salon.

Step 4 of the original pamphlet says the following: "Connect all shrouds to the mast and spreaders." These instructions make no sense whatsoever. Why in the world would anyone wait until this point in the process to connect the shrouds to the mast and spreaders? Look at the picture below. To connect the upper shrouds to the tangs at the top of the mast, you'd have to put a ladder on top of the tow vehicle. To connect the lower shrouds to the tangs near the spreaders, you'd need a larger ladder standing on the ground. You'd also have to stand on this ladder to mouse the upper shrouds to the spreaders.
Let's just move to Step 5, which makes a lot more sense: "Connect the upper shrouds to their deck chainplates.
Do not attach the lower shrouds at this point." Ericson did not provide a picture to accompany this step of the instructions. The picture, below, however, should provide some assistance. The port side chainplate is just barely out of view at the bottom of the picture. On the outboard side we see that the port side upper shroud has been secured to the chainplate with a clevis pin and cotter ring. On the inboard side we see another piece of rigging that is simply lying on the deck. This is the port side lower shroud. It is not secured to the chainplate. Only the upper shrouds, port and starboard, are used in the stepping of the mast. The lower shrouds, port and starboard, are not connected to the chainplates until after the mast is vertical.

Step 6 in the original pamphlet says this: "Tape the toggles of the headstay turnbuckles and the upper shroud turnbuckles in a vertical position. This will prevent the toggles from binding as the mast is raised." The picture below of the chainplate and toggle is included with this step of the instructions.
In keeping with these instructions I do indeed tape the toggles at the chainplates, port and starboard, for the upper shrouds. I also, in keeping with what other Ericson owners have suggested, tape the connections for the link plates on the upper shrouds. Below we see the toggle for the port side upper shroud taped at the chainplate. Likewise, we see the connections for the link plate taped. As far as the forestay is concerned, I do not tape the toggle for it, since it is held firmly in place by the drum for the roller furler.

Steps 7-9 in the original pamphlet concern the joining of the various pieces of rigging to the boom. In my experience, it's difficult to join these things while the boom is lying on the cabin top. The boom is curved, the cabin top is curved, and the traveler bridge is curved. For these reasons, there is no good place for the boom to rest securely while you join these various pieces of rigging. It's much easier to join these pieces while the boom is elevated off the deck. Step 10 in the original pamphlet concerns the elevating of the boom. For this reason, I perform this step prior to steps 7-9.
Step 10 from the original pamphlet says the following: "Raise the boom vertically, aft end up, and slide the gooseneck into the cove of the mast. Secure the gooseneck to a fixed position by tying the line to a halyard cleat." The original pamphlet provides two pictures.
In my experience, the action depicted below requires a helper. One person must hold the boom aloft while the other person secures the gooseneck. It has a tendency to slide back and forth in the track. This is why a second person is necessary. Someone must hold the boom.
In the picture below I have just used a line to secure the bottom of the boom to the downhaul cleat.
Please pardon the tape on the ends of this line and on other lines in other pictures. I would later whip the ends when I had the time.
The original pamphlet says nothing about the securing of the upper end of the gooseneck. My friend and I have found this to be necessary. This, of course, keeps the boom from sliding up the track. In the picture below, we are using the end of a halyard, because we do not have another line available at this moment for this purpose. After this time, I would use a separate line for this purpose.
Step 7 in the original pamphlet concerns the joining of the boom guys (also called the bridle) to the boom and the link plates in the upper shrouds. In my experience it is better, as I will explain, to perform Step 8 first.
Step 8 in the original pamphlet reads as follows: "Attach the backstay to the aft end of the boom, snapping on the boom topping lift shackle." The instructions for this step have caused more confusion than any other. The instructions say to attach the
backstay to the aft end of the boom. Then, in the same sentence they say to attach the
boom topping lift. So which one is it? The backstay or the boom topping lift? Could it be both? Could it be neither? The picture that the original pamphlet provides does not help to clear things up. We see a man with a snap shackle in his hand.
It would be impossible to join the backstay to the aft end of the boom. In the picture below, we see the backstay joined to the top of the triangle plate.
In this next picture we see the two splits of the backstay joined to the bottom of the triangle plate. It makes no sense for the original pamphlet to instruct owners to "attach the backstay to the aft end of the boom." Perhaps the original pamphlet is referring instead to the pigtail that is also joined to the bottom of the triangle plate.

The pigtail, however, is not a piece of rigging that is designed to handle heavy loads. Its sole purpose is to prevent the boom from swaying from port to starboard when the boat is motoring or is docked or is at anchor. In the picture below, we see the pigtail led forward from the triangle plate (hidden behind the wooden piling) to the topping lift. This leads us to consider the original pamphlet's words on the topping lift. The pamphlet tell us to snap on the "boom topping lift shackle." The boom topping lift, like the pigtail, is not a piece of rigging that is designed to handle heavy loads. Its sole purpose is to prevent the boom from drooping down into the companionway and cockpit when the boat is motoring or is docked or is at anchor.

Here's a picture of my boom topping lift coiled up and ready for installation on the mast. This wire is only about 1/16 of an inch in diameter. I can't imagine that Ericson would really want anyone attempting to step the mast of the Ericson 25 with this thin wire.

The picture below is from an original promotional document for the Ericson 25. In it, we see a piece of rigging that is led from the masthead toward the end of the boom. If you look carefully, you'll see that this piece of rigging does not extend all the way to the end of the boom. There is a junction of some sort, and from this junction there extends a small piece of rigging to the end of the boom. I believe that what we are seeing here is the backstay (extending aft from the masthead), the triangle plate (the junction), and the pigtail. Also if you look closely you will see another piece of rigging that extends downward from the triangle plate toward the man. While it might appear that it is performing some function, I believe that it's not. I believe that this is simply one half of the split backstay and that it is simply hanging free.

The picture below, from the original pamphlet, appears to show the same thing. If you look closely, you can see the triangle plate with the two halves of the split backstay hanging down on either side of the boom. The pigtail extends from the bottom of the triangle plate to the end of the boom.
There are two things that we can conclude from our examination of the above two pictures. First, the men in the pictures are using the backstay and the pigtail to step the mast, not the topping lift. This leads to our second conclusion, namely, that the instructions for Step 8 in the original pamphlet are poorly worded. Clearly, they use the term "topping lift" for the small piece of rigging that Ericson 25 owners typically call the "pigtail."

If any doubt about this remains, perhaps we can dispel it with a glance at the diagram that is included in the first edition of the mast-stepping instructions for the Ericson 23. Notice that the backstay is led down to what is called the "link plate," i.e., the triangular plate. The artist has lightly and partially sketched one half of the split backstay hanging down from the triangular plate. More importantly, notice that between the triangular plate and the end of the boom is the pigtail, what they here have called the "boom topping lift." This should make it clear that Ericson Yachts intended the owners of the Ericson 23 and the Ericson 25 to use the backstay and the pigtail to step the mast.
We must wonder, however, if indeed this method is the best and the safest method. It all depends upon whether or not the fittings on the pigtail are strong enough to support the weight of the mast.
If you research some of the old postings on the Ericson Yacht Owners forum, you'll discover that at least one Ericson 25 owner has had his pigtail fail. He was fortunate that it failed early in the mast-stepping process and that he lost neither his mast nor his life.
Perhaps Ericson Yachts became aware of this weakness at some point, because in a second edition of the mast-stepping instructions for the Ericson 23, the original method is abandoned for a newer one. If you read both editions of the instructions, you'll find that this step, i.e., Step 8, is only one that is different. So what emendation did Ericson make to Step 8? Instead of instructing the owner to use the backstay and topping lift, i.e., the pigtail, to step the mast, they instructed the owner to use one of the halyards. In the picture below from the second edition, you see this new approach clearly illustrated.

For some reason, Ericson Yachts apparently did not update the original mast-stepping pamphlet for the Ericson 25. It is possible that they did, but that the second edition has never been scanned and placed on the Internet for observation. Whatever the case might have been, the updated approach in the second edition of the Ericson 23 pamphlet is a safer and more reliable one. I know of at least one Ericson 25 owner who uses this updated approach. He himself urged me to adopt it before I ever attempted to step my own mast.
To secure the halyard to the end of the boom with a bowline, you first need to install a shackle through the outhaul eye on the end cap. You should resist the urge to use the thin stainless steel tang at the end of the end cap. This lightweight tang is for the topping lift and the pigtail. More on this lightweight tang as we go along.
You must make fast the other end of the halyard to one of the cleats on the side of the mast opposite the mast winch. At this time the halyard should have enough slack in it so that you can tilt the boom backwards towards the cockpit. In other words, the boom at this point should not be perpendicular to the mast. You need to be able to tilt it astern so that your helper can install the boom guys, i.e., the mast-stepping bridle. The installation of the mast-stepping bridle is Step 7 in the original pamphlet.
Step 7 in the original pamphlet says the following: "Attach the boom guys, one port and one starboard, to the tangs on the aft end of the boom and the link plates on the upper shrouds." The pamphlet provides two pictures to illustrate this. In the first picture, we see a man joining one of the boom guys (also called the bridle) to the tang on the aft end of the boom.
In the second picture, we see the man joining the other end of the boom guy (also called the bridle) to the link plate in the upper shroud. This is not a good picture, and it's difficult to understand exactly what this man is doing.
Here's a better picture. We see the port side boom guy joined to the port side link plate in the upper shroud.
A close-up.
The starboard side.
We've now reached Step 9 in the original mast-stepping pamphlet. The instructions are as follows: "Reeve the main sheet through all the blocks on the boom and the traveler, knotting the sheet to the block on the traveler." Recall that Steps 7, 8, and 9 in the original pamphlet were intended by Ericson to be carried out while the boom was sitting on the cabin top. The instructions for Step 9 assume that you do not keep your main sheet
roven through all the blocks on the boom. In other words, the instructions assume that you reeve and unreeve the main sheet each and every time you step and unstep the mast. There's really no reason why you shouldn't keep your main sheet roven through these blocks all the time. Here's how I keep mine all the time. For more on this, see my article, "Rigging, Running, Main Sheet Blocks and Main Sheet Replacement."
If you've followed my suggestions, then your next step should be to take in the halyard and make it fast so that the boom is perpendicular to the mast. Notice in the picture below that the coiled main sheet is hanging freely from the blocks.
Next, you should grab the primary block and pull it downward and aft to the traveler. There, you join the block to the traveler by means of a toggle.
At this point the original pamphlet transitions from the section entitled "Preparing the Mast for Raising" to a new section entitled "Raising the Mast." Let's now examine the steps for this new section on the raising of the mast.
Step 1 in the original pamphlet is as follows: "Lead the free end of the main sheet directly from the forward block on the boom to the jib halyard winch on the mast. Take three turns around the winch drum with the sheet." These instructions, unlike some of the others, are quite clear. Here's the picture that accompanies these instructions:

Here's my picture. Notice that the boom is perpendicular to the mast and everything is ready to go. Nevertheless, there is a problem. The main sheet is not long enough to reach the winch on the side of the mast. Why? Because I did not know how long the main sheet needed to be. The old one was was 30 feet. When I ordered the rope to replace it, I thought it would be smart to get five extra feet. Even with with these five extra feet I did not have enough. If I could do it all over again, I would order 40 total feet, even though this is far more than is needed for the sheeting of the main sail from the cockpit. I discuss all of this in my article, "Rigging, Running, Main Sheet Blocks and Main Sheet Replacement."

In the picture below my buddy demonstrates the problems that we had with this 35 foot main sheet. We could only get two turns on the drum. Moreover, the working end was so short that it was almost impossible to grasp it. The way we got around this on this occasion and on future occasions was simple. One of us grasped the mast with two hands and lifted it out of the bow crutch while the other one put three turns around the drum of the winch and started cranking on it with the winch handle.

Step 2 in the original pamphlet reads as follows: "Crank up the main sheet, turning the winch by handle with one hand, taking up the sheet with the other. This cranking action will raise the mast to an upright position." Well, yes, this is somewhat true. This cranking action will raise the mast, but it certainly does make things much easier if there is a helper present to grasp the mast, lift it off of the bow crutch, and then provide some additional muscle as the person at the winch first begins to crank on the winch handle. Here's the picture that the original pamphlet provided with the instructions:

In the pictures above and below, the mast is well past the tipping point. There is a certain point, not very high above the bow crutch, when it becomes much easier to raise the mast with the winch. It's not as if the person at the bow must push on the mast like one of those battle-weary Marines on the summit of Mount Suribachi in World War II. This really is a good system for stepping the weighty mast on this boat.
When the mast is well past the tipping point and easy to control by the person on the winch, that person at the winch can pause and allow the person at the bow to join the forestay to the forward chainplate. This is a necessary step for those who have a flexible roller furler on their forestays. Recall that those without roller furlers will be able to join the forestay to the forward chainplate at the same time that they join the upper shrouds to the amidships chainplates. This is before the mast-raising ever begins.
The picture below illustrates well the rigging of the boom in this mast-stepping system. At the aft end of the boom is the halyard, joined to the shackle in the outhaul eye with a bowline. On either side of the aft end of the boom are the boom guys, i.e., the bridle. The main sheet is led forward to the mast winch.
If you dig through different postings by different Ericson 25 owners on the Ericson Yacht Owners forum, then you'll find that some owners have said that this main-sheet-mast-winch technique is awkward, difficult, and prone to fouling. All I can say to this is that they must have done something wrong.
Some Ericson 25 owners have been unhappy enough with the main-sheet-to-mast-winch technique that they have adopted another technique, which is essentially the same technique set-forth in the mast-stepping instruction pamphlets (both the original one and the updated one) for the Ericson 23. This technique calls for the use of a double block at the aft end of the boom and two single blocks on the coamings of the cockpit with a line roven through these blocks to one of the winches on the cockpit coamings. Below we see an illustration from the second edition.
Here's a close-up from the first edition. Both the first and second editions, as I said, have the same cockpit block-and-winch set-up.
I know one Ericson 25 owner who has experimented both with the main-sheet-mast-winch set-up and cockpit block-and-winch set-up. He's never had problems with the former set-up, but he prefers the latter set-up primarily because he prefers to be away from the mast when stepping it. He and I both, however, have expressed concern about the use of the thin stainless steel tang on the aft end of the boom.
This tang is minuscule compared to all the other tangs on the rig. Note below, for example, the tang used for the bridle. The bridle, as you will recall, is not so much for raising the mast, but for keeping the mast true while it is being raised. There are two of these beefy tangs on the aft end of the boom for the bridle, and these tangs, as I have suggested, do not bear that great of a load. This minuscule tang, on the other hand, by itself bears a very heavy load. It is joined to the end cap of the boom with a single bolt.
Contrast this with the other set-up where the load is borne by the three mid-boom bales, each one bolted through the boom.
Step 3 of the original Ericson 25 pamphlet reads as follows: "When the mast is upright, or the headstay is taut, cleat the main sheet securely. This will keep the mast up while both hands are free." In my experience it's not possible to get the mast to the fully vertical position by yourself. At the very end of the process someone else needs to grab the mast and gently push it the rest of the way. The mast is easy to move at this point, so it requires little effort.
Here, one person holds the mast in a vertical position with one hand while the other person cleats the main sheet.
Now the person at the mast continues to hold it, while the other person installs the second pin in the mast hinge. For those who have an original Ericson 25 mast tabernacle, this step is unnecessary.
My friend and I have found that it helps if one of us pushes downward on the boom during this pinning process.This helps to keep the holes aligned while the other person inserts the pin.
Step 4 of the original pamphlet makes the following statement: "Attach one side of the split backstay to one of the chainplates on the transom, port or starboard as you choose." The pamphlet then provides the following photograph:
In the picture below, we see the port side of the split backstay joined to the chainplate on the transom. The starboard side of the split backstay hangs free.
Step 5 in the original pamphlet contains the following instructions: "Disconnect the boom from the backstay topping lift temporarily." If you are using the halyard in place of the topping lift, i.e., the pigtail, then this step is unnecessary.
Step 6 reads as follows: "Attach the other leg of the split backstay to the other transom chainplate." The first time I stepped the mast I was unable to accomplish this task. I had recently had gotten new rigging, and it was impossible for me to tune the rig by adjusting the turnbuckles while the mast was sitting on sawhorses. Only now, with the mast up, could I finally carry out these fine adjustments. My friend and I determined that we needed to loosen the forestay in order to join the starboard side of the split backstay to the chainplate on the transom. To adjust the forestay turnbuckle, I had to disassemble part of the drum assembly of the roller furler.
It took quite a bit of adjusting, but eventually we were able to get it all together.
Step 7 in the original pamphlet says the following: "Reattach the boom to the topping lift." This step is unnecessary if you use the halyard.
Step 8 says, "Remove the boom guys and stow below."
Step 9 says, "Attach the lower shrouds to their deck chainplates." The pamphlet provides the following photograph:
Step 10 reads as follows: "Adjust all turnbuckles to give stays and shrouds the desired tautness." Accompanying these instructions is this picture:
I've found that these Velcro-wrap pins make things much easier when it comes to stepping and unstepping the mast and tuning the rig. Cotter rings take a long time to install and remove, and for this reason they make the tuning of the rig more difficult.
The final step is to remove the halyard from the aft end of the boom and return it to its cleat on the side of the mast. As I said from the start, this is not the only way to step the mast of the Ericson 25, but it is one that works.
This ends this tutorial on how I step the mast on
Oystercatcher, my Ericson 25.