Showing posts with label Lewmar. Show all posts

Anchor, Chain Locker, and Anchor Roller, Part 14, Marking the Anchor Rode and Anchoring

Oystercatcher at anchor in the Cooper River on an outgoing tide
Having completed the installation of the chain locker panel, and having completed what seemed like a million other tasks, I finally was able to launch Oystercatcher and put her to good use. Along the way, I of course found the opportunity to anchor her and thus try out her new anchoring system that I had labored so long to complete. My anchoring of Oystercatcher and some of the final tasks that I undertook in the months after her first launching are the subject of this posting.
One of the first things I noticed about Oystercatcher after I had docked her in her slip was that the 33 pound Lewmar claw anchor did not look out of proportion. That was good.
In fact, I thought the anchor, the anchor roller, and the anchor platform all looked quite nice together on this boat.
Here's how the mahogany anchor platform appeared from the starboard side of the boat. Please pay no attention to the bow line running athwart it and athwart the blue furling line. This was but a temporary thing.
The mahogany anchor platform, sitting as it was on the centerline of the deck, did a nice job at distracting attention from the offset anchor roller. You'll recall from my earliest postings that this was one of my concerns.
There was plenty of room in this set-up for the 5/16 inch chain.
One task that I had not completed before the launching of the boat was the painting of the epoxy in the old navigation light holes. You'll remember that I had removed these old lights and filled the holes with thickened epoxy. Now I needed to get some paint on them before the sun started to break down the epoxy.
Ideally, I would have used gelcoat for this job, and I would have tried to get a perfect match with the existing gelcoat. It was, though, difficult to work in these conditions. It was hot, it was hard to reach this area from the dock, and the boat was moving up and down. Besides, I had plenty of other more pressing jobs to complete now that the boat was sitting in the water.
For this little project I used Blue Water Marine Mega Gloss one-part polyurethane paint. I had purchased a quart of this economy grade paint from RAKA Epoxy for miscellaneous touch-up work.
Working from the dock was so much more difficult than working on the boat under the tarp back home. It's easy to see why there are so many bad looking boats in so many marinas, especially in this part of the country - where you can leave your boat in the water year round. Up north, you have no choice but to haul the boat out every autumn.
This made me all the more glad that I had purchased this trailerable Ericson 25. I could haul the boat out free of charge, and I could work on her in my own boatyard - i.e., the yard beside my house - without having to pay a boatyard for haulout and storage fees.
Some of my neighbors at the marina do everything they can to avoid these fees - sometimes to the point of what appears to me to be folly. Is it better to pull the prop shaft while the boat still sits in the water, or is it better to do this work while the boat sits on the hard? "Better work fast to hammer that wooden plug into that hole; that water comes through there faster than you'd ever think." "You don't have to worry about that plug while you're working on that prop shaft. It'll stay put." These are the sorts of things I've heard from two different people in my area of the marina alone.
After I had applied two coats of this polyurethane paint to the old nav light holes, I focused on the marking of the anchor rode. My friend and I had experienced some mild frustration in our initial anchoring, because it was impossible for us to determine how much rode we had paid out. We both talked about our experience with this issue, he from his Coast Guard experience, and I from my experience of sailing aboard tall ships, where it's common to mark the rode in shots, with one shot equaling 90 feet (15 fathoms). Since I only had 230 feet of rode with which to work - 200 feet of rope and 30 feet of chain) - the shot approach was not practical. I opted instead for markings at every 50 feet.
I used seine twine for these markings. I had earlier purchased a one pound spool of #36 twine from Sgt. Knots in North Carolina. Seine twine is a common sight on tall ships, where it's used for all sorts of things, especially for the mousing of shackle pins and the whipping of the ends of lines.
Starting at the point where the chain joined the anchor, I measured out 50 foot segments of the rode. I marked the 50 foot mark with one lashing, the 100 foot mark with two, and the 150 mark with three. Below, we see the 150 foot mark.
The 200 foot mark, of course, received four lashings.
In terms of the anchoring process itself, I should note that the technique that I had envisioned and that I had incorporated into the design worked well. The chock and the port side cleat were of great assistance to me in the paying out of the rode by hand. Likewise, the chock and the cleat worked well in the securing of the rode while setting the hook.
As far as the anchor roller itself was concerned. As you see in the pictures above and below, despite the fact that the roller was canted to the port side, the boat still sat centered relative to the anchor itself. Moreover, it did so with a fair lead on the rode. There was no biding or chafing of the rode on account of the width of the Garhauer anchor roller and its flared side pieces on its forward end.
All in all, this was a satisfying set-up - one that was both practical and aesthetically pleasing - and I was glad that I had expended the time and effort to make it a reality.
This ends this multi-part article on my creation of a new anchoring system for Oystercatcher, my Ericson 25.

Anchor, Chain Locker, and Anchor Roller, Part 12, Anchor and Rode, Installation

The installation of the nylon and chain rode
Having completed my installation of the chain locker platform I could now focus on the installation of the nylon and chain rode. This was the simplest and most pleasing part of this entire project. The steps I took to accomplish this on Oystercatcher, my Ericson 25, are the subject of this posting.
I had earlier purchased a 33 pound Lewmar claw anchor. I explained my rationale in an earlier posting for my purchase of this anchor designed for boats in the 36-40 foot range: http://www.ericson25.com/2016/03/anchor-chain-locker-and-anchor-roller_11.html
I also had earlier purchased 30 feet of chain for the rode.
This was Acco brand 5/16 inch, G4, High Test chain. I had purchased it from Defender, the well-known chandlery in Connecticut. According to my research, the suggested minimum by ABYC (American Boat and Yacht Council) for a 25 foot sailboat with a 9 foot beam in 30 knots of wind was as follows: 1/4 inch chain with 150 feet of 3/8 inch nylon rode. The ABYC suggested-minimum for a 30 foot sailboat with a 10 foot beam was 5/16 inch chain with 200 feet of 7/16 inch nylon rode. Just as I had done with the anchor, I up-sized for the sake of safety. In other words, I followed the ABYC suggestions for a 30 foot boat with a 10 foot beam, even though I had a 25 foot boat with an 8 foot beam.
This Acco brand 5/16 inch, G4 High Test chain that I purchased was made in the U.S.A., and it had a working load of 3900 pounds. I opted for 30 feet of this chain on the recommendation of Don Casey and Lew Hackler, Sensible Cruising: The Thoreau Approach, a Philosophic and Practical Approach to Cruising (1986). These gentlemen confirmed what my research had revealed - that no one would want less than 5/16 inch chain, even on a small pocket cruiser such as the Ericson 25. It's all about the catenary effect. These gentleman also recommended a minimum chain rode of 3 fathoms (18 feet), but urged their readers to consider 30 feet instead. Again, it's all about the catenary effect. The heavier the chain and the longer the chain the more likely the pull on the anchor is horizontal (which keeps it set in the seafloor) rather than vertical (which frees it).
The G4 chain had arrived at my house in a plastic bucket. Yes, that's how Defender ships chain by UPS, in case you're wondering. Surprisingly, the shipping was not that much more than it usually is from Defender. I guess that if it weren't, then no one would ever buy it online from Defender. I should mention that I bought this chain from Defender rather than from a local West Marine because Defender sold Acco brand G4 High Test. The highest grade that West Marine sold was Acco brand G3 Proof Coil. The G4, as I said, is rated to 3900 pounds. The G3, on the other hand, is 1900 pounds. There is not that big a difference in price between the two, and it actually cost me less to buy the G4 and have it shipped to me in South Carolina than it would have cost me to buy the G3 locally from West Marine.
In terms of the shackles, I again did my homework. According to my research on various online sailing forums, Crosby brand shackles were preferable to all others. Hamilton Marine in Maine was the only chandlery I could find that sold the High Test versions - recognizable by their galvanized pins. The lower test versions, I should note, have red pins. I purchased two, 3/8 inch, High Test shackles. Each shackle was rated at 2 tons, in other words, 4,000 pounds. This meant that the shackle closely corresponded to the 3,900 pound rating of the 5/16 inch G4, High Test chain. If I had not purchased this 3/8 inch High Test shackle, then the shackle would have been the weakest link in my entire anchoring system.
One of these shackles was for the joining of the chain to the anchor. The other was for the joining of the chain to the eye splice in the nylon rode. In terms of the chain itself, it's worth pointing out that if you click on the picture below, you can see that Acco has stamped "G4" into the side of each link.
As far as the nylon rode was concerned, I had earlier purchased a box full of it from West Marine during one of their one-day sales. That saved me about thirty dollars.
This wasn't the bottom of the barrel stuff. It was manufactured for West Marine by New England Ropes. It included a pre-spliced eye.
I opted for 1/2 inch x 200 feet of nylon rode for several reasons. First, it exceeded ABYC standards for 30 foot boats in 30 knot winds. I had a 25 foot boat. Secondly, it had a tensile strength, i.e., a breaking strength, of 7,500 pounds and a working strength of 2,800 pounds. Finally, I knew an Ericson 25 owner in Alaska who used 1/2 inch x 200 feet of nylon rode. He said that he preferred the 1/2 inch size rode because it was easier for him to handle when the time came for him to weigh anchor. I should note that this is the same E25 owner from Alaska whose anchor roller set-up I used as a model of sorts for my own: http://www.ericson25.com/2016/03/anchor-chain-locker-and-anchor-roller_8.html
I began my installation of these components by mounting the anchor on the anchor roller.
Then I applied marine grease to the pin of the shackle. This would help me in my installation of the pin, and it would help me down the road whenever I needed to remove it.
After I had installed the pin in the shackle, I secured the pin in place by installing a plastic wire tie. This would prevent the pin from gradually working itself free. I also locked the chain in place by means of the chain stop. This would prevent the anchor from slipping off the roller.
Back in the cockpit I removed the nylon rode from the box and carefully uncoiled it.
With the bitter end in hand, I walked forward to the anchor roller. It was early April in the Carolina Lowcountry, and for several weeks pollen had been blowing around all over the place. The deck and the companionway hatch were covered with it, despite the fact that the boat was well tented.
Down inside the chain locker, I tied off the bitter end to the stainless steel eye with a bowline. This end of the rode would not bear a load. The knot was simply a way of ensuring that I did not loose the rode whenever I was paying it out by hand.
Here's how it looked from the V-berth. All 200 feet of the nylon rode had to fit in the locker with enough room left over for the 30 feet of chain. I was confident that the nylon rode would fit, because the Ericson 25 owner in Alaska had told me that he could fit this same amount in his own chain locker.
After I had fed almost all of the 200 feet of nylon rode into the chain locker, I joined the eye splice to the chain with the second Crosby brand High Test shackle. Just as I had done with the other shackle, I greased the pin, and I secured it in place with a plastic wire tie.
After I had completed these tasks, I fed most of the 30 feet of chain into the locker.
Inside the boat, I had temporarily installed the chain locker panel to ensure that the nylon rode and the chain would not spill out of the locker into the V-berth. Fortunately, everything fit together well. Now I needed to install this panel permanently. That is the subject of my next posting.
This ends this posting on how I installed the anchor and the rode on Oystercatcher, my Ericson 25.

Anchor, Chain Locker, and Anchor Roller, Part 3, Analysis, Part III

The components of the new anchoring system loosely fitted into place
Having completed my thoroughly unexpected and thoroughly unpleasant digression to repair the deck core at the bow of the boat, I could now continue to determine where I would install the various components of the new anchoring system that I had purchased for Oystercatcher, my Ericson 25. The steps to reach some conclusions on this layout issue out are the subject of this posting.
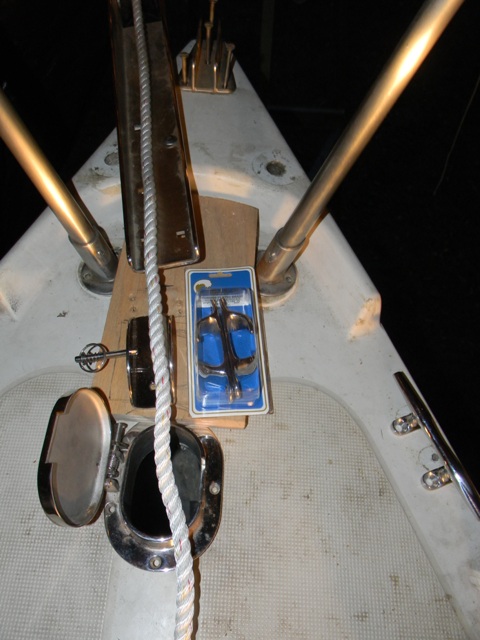
You'll recall from the previous posting that I had cut the hole for the new oval chain pipe that I would install over the chain locker. You'll also recall that I had decided to install a block of wood on the centerline of the deck and that this block of wood would serve two purposes. On the one hand, it would provide a foundation for the anchor roller; on the other, it would conceal the hole that I would soon patch in this area forward of the chain pipe. This was the hole where the old ventilation cowl was located. In the picture below, the mock-up block of wood is concealing this hole.
I knew that I would need to custom-cut this block of wood so that it would fit into this space. Below you see the arc that I have scribed at its forward end.
Below, we see the mock-up dry-fitted into place.
Now it would be easier for me to figure out where exactly I needed to install the Garhauer brand anchor roller and the Lewmar brand chain stop.
The picture below illustrates clearly why the real block of wood would need to be about twice as thick as the mock-up. You can also tell from this picture that I had not yet fully determined how I would terminate the block of wood on its aft end. Notice that in this picture the wood encroaches on the flange of the chain pipe.
You'll notice below that I have scribed an arc along the aft end of the block to see whether a a block of wood in this shape would be both practical and visually appealing.
My work with all of these components was not as easy as it might seem. It was hard to hold the anchor roller in one hand and a chain stop and a pencil in the other. I also, of course, had to take into account the anchors that would hang on this roller. The roller had to be positioned far enough forward so that the anchors would not come into contact with the hull of the boat, but the roller could not be positioned too far forward; otherwise it would present more opportunities for trouble in terms of the fouling of the anchor rode on the roller when the weather was up.
I had purchased two different anchors at two different times, taking advantage of the price matching that West Marine used to do. First, I purchased a Lewmar brand Delta plow anchor. This 22 pound anchor was rated for boats in the 25 - 41 foot range. My friend with the Stamas 27 powerboat (that I discussed in the previous posting) had success with this type of anchor in the pluff mud of the Carolina Lowcountry, so I figured I would too. This anchor fit well in the 24 inch Garhauer AR-30 anchor roller that I had earlier purchased.
Below we see my friend's Stamas 27 as he launches it from his trailer for camping trip we made out to Capers Island, South Carolina, an uninhabited island north of Charleston. At the bow is a Delta plow anchor, at this moment resting on its side. I believe he had positioned it this way on the deck to prevent it from getting snagged by the bow roller during his launching of the boat.
My thinking on the size of my Delta plow anchor changed when my friend and I later made a weekend trip out to the inlet at Morris Island, South Carolina for the annual campout for the Friends of the Morris Island Lighthouse. This lighthouse, long ago abandoned, now sits in the water off Morris Island, an uninhabited island at the mouth of Charleston Harbor. At any rate, there was a low pressure system off the coast of Florida. On the second night we were out there at the Morris Island Inlet the wind picked up to 30 knots, and many of the boat owners spent a sleepless night setting and resetting their anchors because their anchors simply would not hold. My friend's Stamas 27, which was similar in weight to an Ericson 25, held fast, but only because he'd anchored his boat in a nearby tidal creek. All of those in the inlet were harried by the unrelenting wind.
As soon as I got back home I began to look around for a heavier anchor. I had heard good things about the Lewmar brand claw anchor, and I found a 33 pound one for sale at an incredibly low price on the Defender website. The local West Marine matched the price, and I walked out of the store with this weighty monster in one hand and my Garhauer anchor roller in the other. Yes, this 33 pound claw fit into the Garhauer roller, but just barely. This claw was rated for boats in the 36-40 foot range. Everyone knows that these specs change when you factor in high winds. I had seen too many persons at Morris Island spend a miserable night fighting the wind. I didn't want what they had on any night I might spend on my Ericson 25.
I decided that I would make the 33 pound claw my primary anchor and the 22 pound plow anchor my secondary one. Fortunately, both anchors fit well on the anchor roller in the spot where I hoped to install it on the bow. In other words, neither posed a threat in terms of damaging the hull. A friend stood on a ladder and held the anchors in place while I knelt on the bow and held the roller in place. With my one free hand I quickly marked the spots where I needed to drill the holes for the bolts that would hold the roller in place.
The carriage bolts for the anchor roller were 5/16 inch in diameter.
I decided that I would drill only one hole. This one hole would allow me to insert one of the carriage bolts and then pivot the roller here and there slightly until I figured out the best spot for it to be.
The peak of the bow through which I drilled the hole was over two inches thick. It appeared as if Ericson had sandwiched a block of wood between two thick layers of fiberglass.
As soon as I drilled the hole I went below and looked up into the chain locker. I had done a lot of guesswork in attempting to determine where this hole would be. Fortunately it appeared that there would be enough room not only for a washer and nut on this bolt, but also on the next one even farther forward than this one.
With this one carriage bolt loosely inserted into this first hole, I could now freely experiment with various arrangements at the bow. I still had not quite figured out where I would install the chain stop and how I would cleat off the rode when the anchor was deployed. Below you see that I am using the 1/2 inch nylon rode in place of chain to make some decisions about the chain stop. I had no desire to use the heavy chain for this experiment.
Ideally, I wanted a cleat between the chain pipe and the anchor roller.
This was similar to what my friend with the Stamas 27 had. He used one of his two cleats when setting the anchor. He had the luxury of lots of space at the bow. I did not.
I considered the set-up below, but I was concerned that there was just not enough space for me to make proper use of the cleat.
This was when I began to think about using a chock to guide the nylon rode to one of the cleats on the port or starboard sides of the bow.
I also, however, considered installing a Samson post, also called a mooring bit or bollard. I knew someone else who had a set-up with one of these pieces of hardware.
I looked at the dimensions online for the Whitecap brand and the Sea Dog brand Samson bits. This was the only way I could determine whether one of these would fit in this space. Above we see the Whitecap brand Samson post available from Defender.
I liked the Whitecap Samson post because it seemed to be of a higher quality.
I marked the wooden block mock-up to get a better idea of how the Samson post would fit, or not fit, in this space.
Eventually I concluded that there just wasn't enough space for the Samson post. With about 18 inches more space between the anchor roller and the chain pipe it might have worked.
Having abandoned this idea, I returned to my previous idea of using a chock to lead the nylon road to one of the cleats at the bow. This was the most workable solution. Now I needed to create the real wooden block that I would place here at the bow. That would help me figure out exactly where I needed to locate the chain stop and the chock.
This ends this posting on how I reached some firmer conclusions regarding the set-up for my new anchoring system on Oystercatcher, my Ericson 25.