 |
| Masthead of Oystercatcher with its new Delrin sheaves for the all-rope halyards |
Many a sailboat manufactured decades ago was rigged with wire-rope halyards instead of the all-rope halyards more common today. Back then, rope technology had not advanced to the point where an all-rope halyard could provide the same, low-stretch benefits of a halyard that was mostly made of stainless steel wire. Since sailboats several decades ago tended to be rigged with wire-rope halyards, their mastheads understandably tended to be outfitted with sheaves designed for wire-rope, not all-rope halyards. An all-rope halyard is easier to handle than a wire-rope halyard. For this reason, therefore, many an owner of an older sailboat will transition to all-rope halyards at some point or another. When he makes this transition, he will likely, at the same time, consider making a transition to sheaves designed for all-rope halyards. These newer sheaves are concave in shape, whereas the older ones were V-shaped. Being concave, the newer ones accommodate more readily the shape of the rope, and accordingly they allow for less wear and tear on the halyards. In this article I describe the steps I took to transition to all-rope halyards and the steps I took to transition to new Delrin sheaves to accommodate these halyards in the masthead of
Oystercatcher, my Ericson 25.
I purchased
Oystercatcher in October 2009 after making two separate visits to her from my home in Charleston, South Carolina to her home at that time in the Pamlico Sound region of the Outer Banks of North Carolina.
The long-time owner of the boat had done his best to doll her just up prior to my purchase of her, but in almost all areas she was, after 35 years, showing her age. Her rigging appeared to be original to the boat, and accordingly was not in good condition.
A friend and I spent two nights on the boat, sailing her from the owner's personal dock to Oriental, North Carolina for haulout. During that transit, the wire-rope halyards, especially the one for the jib, were troublesome. The wire had scored the drum of the winch on the mast, and it was difficult to get good tension in the luff of the jib.
A contributing factor to this problem was the wire-luff jib itself. This boat had an antiquated roller-furler that depended upon a heavy wire, some 7/16 inch in diameter, sewn into the luff. I've discussed this problem in greater detail in my article, "Rigging, a Tutorial."
One of the first things I did after my friend and I trailered the boat back to Charleston, South Carolina was to build four new sawhorses for the mast. I had to have somewhere to store it while I worked on the boat, which sat on a trailer next to my house.
After I had laid-up the mast on the sawhorses, I took some pictures of the rig. The wire-rope halyards in the masthead sheaves are clearly visible in the picture below.
In this next picture we see the wire-rope halyards exiting the masthead close to the mast itself. The outer wires are the stays, the backstay (left) and the forestay (right).
Shortly after this time, in the fall of 2009, I removed the spreaders and the spreader brackets from the mast. An avid Ericson 25 owner, who had counseled me during my purchase of
Oystercatcher, had urged me not to sail the boat again until I had replaced these brackets. He said that they had a history of failing. He himself, shortly before this time, had suffered a dismasting due to the failure of one of these brackets. Much to my surprise, one of my brackets had already failed to some degree. A weld on one of the joints indicated a hasty and insufficient fix. I address my replacement of these brackets and spreaders in a separate article.
A full two years passed before I turned my attention once again to the mast and rig of
Oystercatcher. For most of these two years I was involved in a lengthy remodeling project on my house. During most of this period my work on
Oystercatcher involved research and planning - researching how to fix what was broken, and planning how to carry out the many projects in the most sensible fashion possible.
I knew that I needed to replace the spreader brackets and spreaders, but I also knew that I needed to replace the wire-rope halyards. True, they were an annoyance, but even more important was the fact that they were frayed. If you ran your hand up and down them, you'd end up with nicks and cuts from their wiry whiskers.
As I began to focus on this issue, I took some additional pictures. Below we see one of the two halyards at the point at which its rope portion was joined to its wire portion.
In this picture we see the shackles for the mainsail (top, in the picture below) and the jib (bottom, in the picture below).
I began by removing one of the halyards from the masthead. In its place I temporarily rove a 5/16 inch line through the sheaves. From my research, a 5/16 inch high tech line of today was more than sufficient for the load of the sails I would fly. I was, though, concerned about the hand of the 5/16 inch line. I didn't want to have to wear gloves in the handling of these lines. The 5/16 inch line, however, seemed to handle the V-shaped grooves in the existing masthead sheaves.
3/8 inch line was overkill in terms of the load requirements, but it sure was much easier to handle. The only problem was that the existing masthead sheaves were not very accommodating to it.
Another thing that I took into consideration as I considered a transition to all-rope halyards was the structure of the masthead itself.
If it had been designed for wire, then maybe its edges would be unkind to an all-rope halyard.
The edges of this cast aluminum masthead were in fact still rough from the casting process.
The 3/8 inch line meant that there would be even less wiggle room for the halyard, if I opted to make this transition.
Ultimately, at the advice of numerous persons on the Ericson Yacht Owners forum, I decided that I would make the transition to 3/8 inch all-rope halyards.
Also at the advice of some of these persons, I decided to transition to new sheaves at the same time.
With that in mind, I removed the sheaves and inspected them.
Over the years they had worn thin on those sides that came into contact with the rough edges of the aluminum.
I also noticed that the sheaves had different patterns of wear.
On some, the V-groove was deeper and more pronounced than on others.
The thin edges of some of the sheaves were also chipped in some places.
Members of the Ericson forum had said good things about Ed Louchard, a man in Washington state who specialized in replacing old, worn-out masthead sheaves with new ones. All you had to do was remove your masthead and mail it to Ed. He would replace them with the appropriately sized sheaves and then mail the masthead back to you. That's what they said. Given the good reviews, I followed their advice.
The masthead did not come off without some resistance. I figured that was a good thing.
After I had removed the masthead, I took a picture of the profile of the mast. Inside I was glad to see that there was an anti-compression sleeve for the upper shrouds. As this refitting of
Oystercatcher would progress, I would discover that this sleeve was no longer viable. That, though, is another story. If you've not yet figured it out, though, from the many articles I have written about this refitting, there was very little that was viable on this 35 year-old sailboat. Let's see . . . I didn't have to replace the hull, and I didn't have to replace the mast. I guess for those two reasons I should consider myself lucky . . . or should I?
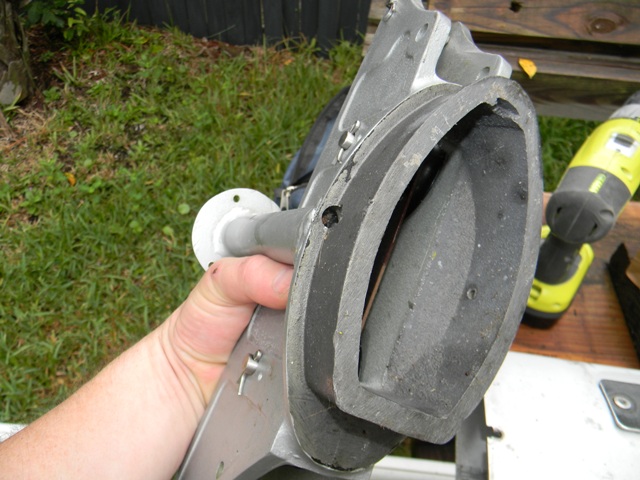
With the masthead in hand, I snapped a few pictures, just for the record.
The flange of the masthead was meaty and solid.
Within, there was a stamp which read, "Masthead, Ericson 25." This was one of the last glances I had at this 35 year old fitting. Shortly thereafter, with some trepidation, I boxed up the masthead and the sheaves and sent them off in the mail to Ed Louchard in Washington state.
I opted to put some UPS insurance on this box, just in case, but whatever compensation I might have received if this box been lost would never have secured for me a new masthead. It could, though, have helped me get a new mast, because that's what I would have had to have done.
A couple of weeks later Ed emailed me some pictures of his completed work. I told him that I would one day give him a shout-out for his work, so here it is. If you're looking to have the same thing done to your masthead, then just give Ed a call at Zephyrwerks: The Sheave Factory, in Port Townsend.
After I had received everything in the mail, I decided to do some work to get the masthead looking nice and pretty . . . and functional. I began by sanding all the rough edges that were still present from the casting process some 35 years earlier. There were rough spots on the interior.
There were also rough spots, as I said, on the edges.
Satisfied with the functionality of the masthead, I moved on making it more pleasing to the eye. I began by priming it - with the good stuff, Zinc Chromate. This is something they apparently developed for painting aluminum aircraft during WWII. Is it known to the State of California to cause cancer, reproductive harm, and everything else you can imagine.? Yes, but what isn't? Can you find this stuff at big box stores such as Lowe's? No you can't. Can you find it in your local hardware store? Yes, you can, at least if you live where I do.
Donning a respirator, gloves, and a long sleeve shirt, I gave the masthead a few light coats of Zinc Chromate.
I followed this up with a few light coats of Rustoleum.
Over two years would pass before I would reinstall the masthead on the mast. Why the long wait? Well, almost everything on a sailboat is related to something else. Remember that antiquated roller furler that I talked about, and that antiquated wire-luff jib? What about those spreaders, that antiquated standing rigging, and for that matter, that irritating anti-compression sleeve that was no longer viable? All of these things stood in the way, and let's not neglect to mention all the work that I did all the other parts of the boat in the interim - the epoxy work, the plumbing, the electrical, the . . . okay, I'll stop here, but I think you get the point . . . there is far more . . . always.
. . . just like there is far more to reinstalling a masthead than simply sliding it into place.
Do you want to know why I post so many pictures of my work on this boat? It's to remind myself (and to remind anyone else who might read this) of how demanding the refitting of a sailboat can be.
One problem that I ran into when reinstalling the mast head was that one of the original screws had torn through the top edge of the mast profile. That was not good.
Rather than trying to fix this specific spot, I skirted it, deciding to install two separate screws on either side of it.
The screws were 11/64 inch, meaning that they were #8 in size.
This meant that I needed to drill a hole one size smaller at 5/32
I marked the mast 1/2 inch down from the edge and then hit each of the two marks with the center hole punch.
I did not drill both holes at the same time.
By doing one screw at a time I would ensure that everything lined up just right.
As much as I would have liked to have installed the masthead at this time, I could not. There was something else blocking my progress.
That something was the anti-compression sleeve for the tangs that would support the upper shrouds. There was also the issue of the pin-hole size of the two tangs pictured left. The new rigging would not fit onto these old tangs. I address this issue in a separate article on my replacement of the standing rigging.
As far as the anti-compression sleeve was concerned, this new one I had to order from Onlinemetals.com. I provide more details about this in my article on the replacement of the standing rigging.
So you see . . . this anti-compression sleeve wasn't directly related to my transition from wire-rope halyards to all-rope halyard and thus my transition from one type of masthead sheave to another, but it definitely was related.
After I had taken care of that seemingly unrelated anti-compression sleeve problem, I could complete the installation of the masthead. I used Tef-Gel in this reinstallation. This sticky substance creates a barrier between dissimilar metals and thus inhibits corrosion.
I was putting stainless steel screws into an aluminum mast and an aluminum masthead. Such a mixture is never good.
Now it was time to install the new sheaves. To reduce friction, I lightly greased both pins.
Then I installed the cotter pins that would hold the sheave pins in place.
Shortly after this time I would temporarily install one of the new all-rope halyards.
I had ordered 120 feet of Samson brand XLS Extra T 3/8 inch rope for the halyards. I would cut this 120 foot length into two, 60 foot pieces, one for each halyard on this mast of almost 30 feet.
I said that I only installed one halyard
temporarily at this time. I did this temporarily, because at this time I simply needed to step the mast in my front yard, and for this I needed only one halyard in place. Why, you might ask, did I need to step that mast in my front yard? So that a sailmaker could take the proper measurements of the boat with the mast in its proper place. How I stepped the mast is the subject of another posting.
This ends this article on the steps I took to convert my wire-rope halyards to all-rope halyards on
Oystercatcher, my Ericson 25.


No comments:
Post a Comment