 |
| The cabinet, pre-painted and ready for the installation of the shelf |
On many a construction project it makes good sense to pre-paint some of the components. Often it is easier to paint these components in advance of assembling them, since access to them is often limited once they are in their assembled state. This rule of thumb held true when I neared the end of my lengthy project on the creation of a usable cabinet space beneath the sink in
Oystercatcher, my Ericson 25. The centerpiece of this project was the cabinet shelf, and I knew that once I had installed this shelf, access to the lower storage area and access to the pockets and coves at the top of the cabinet would be somewhat limited, especially in terms of reaching them with a paint brush. For this reason, I decided that the most prudent course of action would be to paint these areas in advance of my installation of the shelf. In this posting, the ninth in a twelve-part series, I therefore describe the steps I took in the pre-painting of this space.
The first thing I needed to do for this part of the project was to pre-drill all of the holes for the installation of the cabinet shelf. To accomplish this task, I used my Milwaukee Tools right angle attachment. As I have said elsewhere, this tool was invaluable in the refitting of this boat.
Now that the shelf was ready for installation, I could do some pre-painting of it, specifically on its bottom side - the side that would be especially difficult to access, once the installation was complete. In terms of the paint itself, I used Pitthane, a two-part polyurethane. I've discussed Pitthane at length in other articles on this website. For more information, refer to subject heading "Pitthane" in the Labels section on the homepage.
Pitthane rolls well, as long as you work quickly and do not go back over your roll marks more than once or twice.
In the pre-painting of the bottom side of the shelf, I left the long edges unpainted. This would be where I would join the shelf to the cleats with epoxy. I left the ends with the holes unpainted, simply because it made it easier for me to handle this piece of wood while painting it. Later, after the installation, I would paint this small area.
My next task was to prep the cabinet for painting. For this, I used TSP (trisodium phosphate) dissolved in warm water. This mixture would remove any dirt and oils from the work area.
The hull was especially dirty from years of accumulation of grime.
After I had scrubbed the area thoroughly with TSP, I dumped the bucket, rinsed it thoroughly, refilled it with warm water and returned to the boat. My goal now was to scrub the area with warm water to remove the TSP residue and the swirls of dirt that still remained.
I had to do this two or three times before the water in the bucket looked relatively clear and free of dirt.
The thoroughly scrubbed work area.
Outside the boat, I returned to the cabinet shelf and gave it a light sanding in preparation for its second coat of Pitthane.
Back inside the boat, I wiped down the entire work area with xylene to remove any impurities that might remain.
As for the cabinet shelf, I wiped it down with the thinner that was made specifically for the paint.
Afterwards, I used this same thinner to wipe down the work area inside the boat.
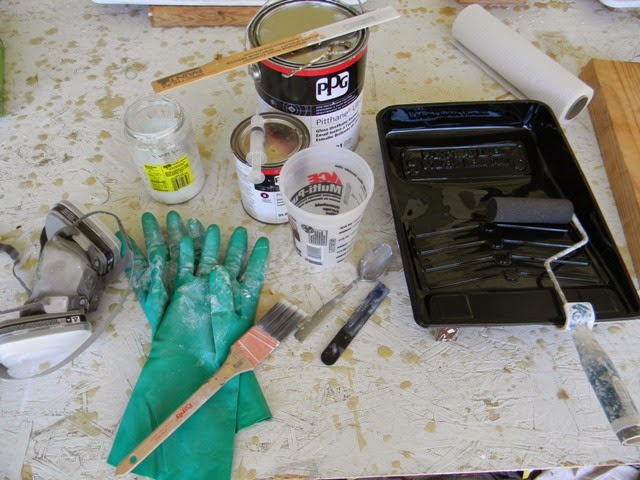
Now that everything was cleaned and ready to go, I could mix up the paint. As you can see in the picture below, I've laid out all the necessary materials for using this two-part polyurethane.
I always use a plastic mixing cup to blend the two parts of the paint. I will simply paint out of this cup if there is no need for rolling.
If, however, rolling is necessary, I pour the contents into a roller pan (always with a clean liner), and use this as the reservoir.
First, I applied the second coat of Pitthane to the bottom side of the shelf.
Then I carried the paint tray (carefully) up the ladder and into the boat, where I proceeded to use both the roller and the brush to apply the first coat of paint to the appropriate areas.
In the pictures above and below, we see how it looked after that first coat of paint.
A day or two later, I broke out the Pitthane supplies once again. Just as I do with epoxy, I always store Pitthane indoors, in a temperature-controlled environment. The hardener, which is in the small can in the picture below, is especially susceptible to outside influences. I always avoid dripping hardener into the gutter around the mouth of the can. If hardener builds up in the gutter, then it prevents a good seal with the lid. That's why I never pour hardener out of the can. I always use a syringe to extract it.
I always use a mixing cup, a new tray liner, and a new roller whenever I use Pitthane. I learned the hard way. Better to have new materials each time. Otherwise, the thinner within the paint breaks down the old paint and causes the new paint to have tiny piece of debris within it.
The second coat.
Another view.
After the second coat had dried, I came back and removed some of the drip marks with a 50 grit sanding drum on the end of my Dremel.
I was glad that I took the time to pre-paint this space, and I was glad that I took the time to cover all of the seemingly hidden coves. After all, I would be storing plates, bowls, and other such items in this space. I really needed it to be nice and clean.
Some of these coves were especially difficult to access, even with the shelf not in place.
Why bother, you might ask, with a space that I would never see? Well, as I said, I wanted this area to be as clean as possible. Covered with this slick, two-part polyurethane paint, these coves would be easier to wipe down by hand, and they would present fewer opportunities for the growth of mold and mildew.
Yes, I considered this to be time well spent and money well spent. Now that this task was complete, I could turn my attention to the final installation and the final painting.
This ends this posting on how I pre-painted the galley sink cabinet shelf and the cabinet itself on
Oystercatcher, my Ericson 25.


No comments:
Post a Comment