 |
| The painted locker with holding tank shelf installed |
Having filled one of the old instrument holes, having enlarged another one, and having installed two different sets of Douglas fir cleats in
Oystercatcher, my Ericson 25, it was now time, at last, for me to install the holding tank shelf and to paint the locker as a whole. You might recall, from the first part of this four-part article, that this project was born from my need to install a holding tank in this space, the most logical of all spaces to do so. You might also recall that, despite the fact that the genesis of this project was an outgrowth of a plumbing-related issue, the project as a whole was one in which I sought to make the most use out of this relatively large and underutilized space through the construction of a secondary shelf and partitions on either side of the tank. Given the time, given the money, and given the effort that I had dedicated to this project up to this point, it made good sense to me to expend just a little more time, money, and effort to make this space, clean, bright, and new-looking. To put it simply, it made sense to convert this space from a dingy gray to a bright white, by applying fresh coats of high-quality paint.

In case you've forgotten, the picture below should help you remember the way I had planned to make use of this space through the shelves and partitions that I had constructed. Perhaps you recall that in my zeal to push this project forward, I had hastily painted the port and starboard partitions with oil-based paint. On all other pieces of wood, I had applied two coats of epoxy. It was now my task to apply paint to this epoxy-coated wood. The painting of these wooden pieces would be a preliminary to the painting of the locker itself.
Before I could apply any paint to these pieces, however, I needed to take care of some unfinished business.
Specifically, I needed to fill some gaps in the laminates of the plywood with thickened epoxy.
With this out of the way, I could focus on the painting. For this project, with the exception of the two partitions I mentioned above, I used Pitthane, a two-part polyurethane paint manufactured by Pittsburg Paints. I'll address the details of this paint as we move along in this posting.
I applied one coat of Pitthane to the back side of this particular piece of wood. This piece was meant to help keep the holding tank in place. After I had applied this first coat of paint, I realized that I had not yet permanently secured the wooden battens to it. Therefore, I halted my painting at this point, and, after the paint had dried, I did one more dry-fit, in order to make sure that everything fit together they way I had envisioned it.
First, I needed to drill and countersink the four holes for the stainless steel wood screws that would secure the large platform to the Douglas fir cleats.
Next, I needed to figure out how exactly I would secure the partitions. Originally, I had planned to use cleats of epoxy-coated southern pine. You might recall that I included some pictures of these small cleats in Part II of this article. My plan had been to
glue one cleat to the bulkhead on the outboard side of the partition and to
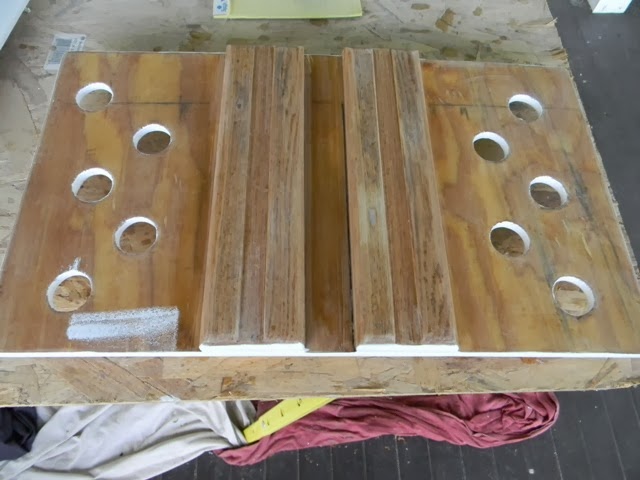
screw another cleat to the bulkhead on the inboard side. The glued cleat, would of course be permanent, the screwed one not. The idea was that the screwed cleat would allow me to install and remove the partition when necessary. This plan might have worked for the forward end of the partition, in other words, the end you see pictured below. It would not, however, have worked for the aft end of the partition. Why? Well, for one thing, on the inboard side, the holding tank would have been in the way. On the outboard side, I probably could have glued a cleat, but the more I looked at it and thought about it, the more I realized that a permanently installed cleat might prevent me from installing and removing the partition, since I could not simply drop the partition in place. Due to the confines of the space, I had to insert the partition at an angle before I could tilt it up to the vertical. With all of this in mind, I eventually decided that I would use four stainless steel brackets on each of the partitions. This made things much easier.

Satisfied with my solution to the partition problem, I moved on the next problem - how to secure the holding tank as firmly as possible. I had already determined that I would use galvanized, pipe-hanging straps. Now I needed to make sure that these straps would line up with the battens that I would soon glue to the piece of plywood you see below (the plywood that is standing vertically against the holding tank). You might be wondering why I had to keep doing dry-fits and making alternations to my plans. The answer? There were so many different parts and pieces that it was difficult to think all the way through this project from beginning to end. Moreover, these different dry-fittings were difficult to accomplish with a high level of precision, because the pieces often did not want to cooperate on account gravity. I could not clamp the piece into place. Therefore, I often had to think through one problem and the next while holding a piece in place with one or both of my hands.

Having determined exactly where the battens should be located (with regard to the slots in the large shelf and the route of the galvanized straps), I drilled the holes through the plywood and screwed the battens into place.
I then did one more dry-fit to make sure that the slots in the large shelf lined up perfectly with the battens.
After wetting out the plywood with neat epoxy, I thickened up the epoxy with colloidal silica and glued the battens into place.
A fair amount of thickened epoxy squeezed through the screw holes. I made sure to clean this up right away.
Likewise, I cleaned up the excess epoxy on the other side. I had learned the hard way at some point early in the refitting of this boat that it is much easier to clean up excess epoxy at the time it is applied than it is to sand it after it has cured.

Another task that I needed to perform at this time was the epoxy-coating of the ventilation holes in the large shelf. Some might say that this was a tedious waste of time. I'll agree with them on one thing. It was tedious, but I don't believe it was a waste of time. Every one of those holes consisted of exposed, end-grain plywood. The end-grain, of course, is the most vulnerable part of the wood. Why not do the job right the first time? That was my thinking. How did I do this epoxy-coating job? I used a small, half-inch, chip brush. I stood the plywood on edge, held it vertically with one hand, and dabbed each hole with epoxy. After I had finished, I turned it upside down, held it vertically again, and again dabbed each hole. This ensured that I had coated each hole thoroughly. Several hours later, I came back and did the same thing all over again, so as to apply a second coat. This method worked very well. About two days later, I sanded the excess away from the surface of the plywood. The picture below gives you some idea of what I mean by "the excess."
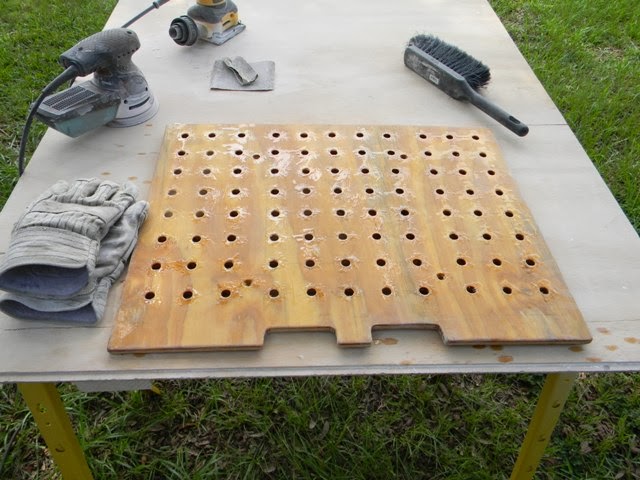
The fully-sanded piece.
I also needed to sand the other piece just a little. Sure, I had cleaned up the excess at the time I had glued the battens, but there was still a slight sheen on the surface that I needed to remove.
As prep-work for the painting of these pieces, I pulled out the Shop-Vac and removed as much dust as possible. The Shop-Vac was especially helpful for removing the dust from the many small ventilation holes.

Pitthane, as I said, is a two-part polyurethane paint. You might have heard of Interlux Perfection. This is a two-part polyurethane that is marketed as a marine-grade paint. Many persons use it to paint their decks and hulls. The benefit of the two-part polyurethane over the single-part polyurethane is its durability. Many, though, find the cost of Interlux Perfection to be unbearable. Fortunately, there is an alternative, and that alternative is Pitthane. This is an industrial grade two-part polyurethane manufactured by Pittsburgh Paints. It's expensive, but it is far more affordable than Interlux Perfection. Why? I supposed because it doesn't have the word "marine" on the label. How did I learn about Pitthane? From a local boatyard here in Charleston, South Carolina. They use it just like they would Interlux Perfection.

One thing I didn't learn from the boatyard was that the heavy-duty, green, Nitrile gloves you see pictured below are what you really need for working with this stuff. The lightweight, blue Nitrile gloves just don't cut it. The thinner, which you see pictured above and below, will quickly cause them to dissolve and tear.

The instructions on the side of the paint can say that you should pour all of the contents of the hardener (in the small can) into the paint (in the large can) at one time. I, of course, did not want to follow these directions. I only needed a small amount. Therefore, I used a small, plastic, epoxy-pot to mix the two parts together. This pot was helpful, because it had small gradation marks in one-ounce increments. The mix ratio was 5-1. See the soup spoon in the picture? I would use this to spoon out the proper amount of paint into the epoxy-pot. See the syringe? I would use this to draw out the proper amount of hardener. Then I would stir the two parts together, just like epoxy. After a couple of minutes I would stop, put the pot down, and then add some thinner. Depending on the temperature, I would add either one or two capfuls of thinner. The maximum working temperature for this product is 90 degrees Fahrenheit. Much of the time that I was working with this paint on this part of the project, the temperature was in the upper 80s to low 90s. I didn't see any problems working in temperatures over 90s degrees, and I know that at the boatyard they use this stuff throughout the summer, when temperatures are normally in the 90s.

The second coat went on this piece well. Remember, that I had already applied the first coat earlier.
The first coat on the first side of the large shelf. How did I paint all those little holes? I used the same technique that I used when I coated them with epoxy. As soon as I had finished painting them, I laid the shelf down and rolled it with paint.
The next day, after the paint had cured, I sanded it lightly to remove the imperfections.
Now it was time for the second coat of paint. From my experience, I must say that the thinner was a necessity. Without it, the paint was too thick and would not lie down. It was also essential for cleaning up small spills, drips, smears, and other such things.
Another thing I learned was that it was not worth trying to reuse rollers, trays, and epoxy-pots. The old paint would lift, as soon as the new paint hit it, thus causing small pieces of old paint to become mixed together with the new stuff.
Here's an example of what I'm talking about. Sure, I tried to scrub out the tray with thinner, but I never could get it entirely clean. Once the paint had kicked, it was difficult to remove.
Coat number two.
Fortunately, I was able to reuse each syringe many times. After I had drawn the hardener from the can and expelled it into the epoxy-pot, I would insert the syringe into the brush jar, which was filled with thinner. Into the syringe I would draw thinner, and then I would expel the thinner back into the jar. This did a good job at removing the hardener and allowing me to reuse the syringe many times.
The flip side of the large shelf shortly before I applied the first coat of paint.
The holding tank plywood and battens ready for the first coat.
First coat on the flipside.
First coat on the flipside.
By this point I had smartened up and started using disposable paint-roller tray-liners to hold the paint. These worked well.
Second coat flipside.
Second coat flipside.
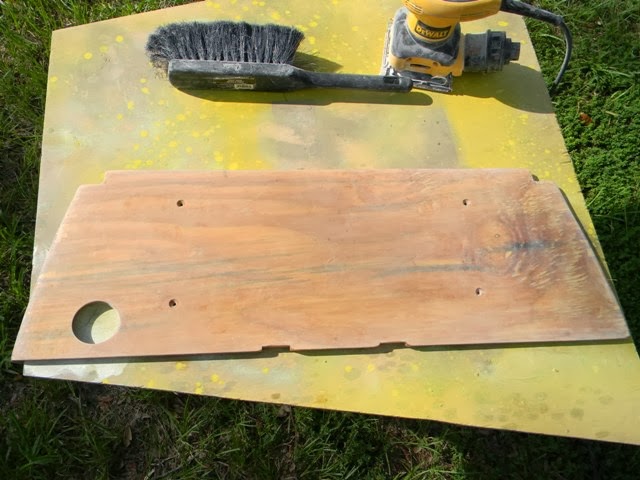
Having painted the above described components, it was now time to turn my attention to the installation of the holding tank shelf. Before I could install this shelf, I needed to drill a rather large hole into it. This hole would provide access to a bolt, nut, and washer that would support the copper grounding plate underneath the boat. I'm not going to go into the details of this grounding plate right here, but I will say that I had no choice but to install one of the bolts for this plate in the area pictured below.
This hole in the holding tank shelf had to be in just the right position. Otherwise, I would not be able to access the nut for this bolt.
Using my hole gauge to determine the appropriately sized hole-saw for this job.
The bronze washer within the hole gauge.
Having cut the hole and reinstalled the shelf, I could see that the hole was just where it needed to be.
The next thing I did was to drill and countersink the four screw holes for the holding tank shelf. Below we see the cleats, shortly after I had drilled the holes through the shelf.
Notice the notches that I cut in the shelf. I did this so that the shelf would more easily accommodate the galvanized straps that would hold the holding tank in place.
Second coat of epoxy on these new cuts.
The finished project, shortly after I had completed the sanding.
Now it was time to do some sanding. I had laid a lot of epoxy and cloth in this area. In order to get the paint to properly adhere, I needed to roughen-up this work with some 40 grit paper on my quarter-sheet sander.
I also needed to use my Rockwell Sonicrafter oscillating tool with its triangular sanding-head attachment and a piece of 50 grit paper. This, of course, was good for tight spaces.
Additionally, I needed to use my Dremel with the right-angle attachment and a 50 grit sanding wheel. This, of course, was even better for tight spaces.
The locker at the end of the sanding process.
I used toluene to clean up all the sanding residue and to clean up the areas of the hull that would soon receive cloth and epoxy to secure the holding tank shelf.
I used a black Sharpie marker to indicate where the edge of the shelf would sit relative to the hull.
In preparation for the glue-up, I cut two-pieces of 10 ounce cloth and dry-fit them into place.
Then I cut two more pieces of cloth. These would overlap the smaller 10 ounce pieces.
Once I had everything ready, I wet-out the Douglas fir cleats and the hull with neat epoxy. Then I thickened the epoxy with colloidal silica. First, I spread the thickened epoxy on top of the cleats and screwed the holding tank shelf into place. Next, I laid down the remaining thickened epoxy on both ends of the shelf so as to create fillets. These fillets joined the ends of the shelf to the hull, and they helped to create a gentle, curved transition between the shelf and the hull.

Since the amount of epoxy in the first pot only allowed for partial fillets on either side of the shelf, I mixed up a second pot and extended the fillets aft. Note that I did not extend them all the way to the bulkhead. The gap between the shelf and the hull was too wide. Why did the shelf not fit more snugly into this space? Well, it did during the dry-fit, but after I had epoxied the cleats into place, it no longer fit just right. I could live with this. I wasn't about to go back and cut a new shelf, just because it was a little bit off. This wasn't finish work.
The shelf with both layers of cloth applied on each side.
A couple of days later, after the epoxy had cured, I came back with the quarter-sheet sander to roughen-up the surface of the epoxy.
The Rockwell oscillating tool was helpful in the tight spots.
The opposite side, fully sanded.
At this time I also sanded the excess epoxy on the three battens (the battens against which the holding tank would stand). Notice the hole in the center? That leads to the bilge. Check out the next picture for more details.
Before I permanently installed the shelf, I took a picture of this area, so that I would remember what it looked like. The protrusion is the centerboard trunk. The wires are a part of the old grounding system. This system I would soon replace. The conduit? It would soon house the cable for the new transducer.
Below we see the transducer itself. This is the Airmar brand B60-12 transducer.
There was a lot of excess cloth around the hole through which I would install the transducer. Before I could paint this locker, and before I could install this transducer, I had to clean up this excess. I started by using the Dremel with a special fiberglass cutting bit. This bit had worked well on other projects on this boat, where cutting holes was the objective, but it was not good for this particular project.
For this little project, the sanding drum with 50 grit paper was just right.
I used the hole saw (the same hole saw that I had used to cut the hole) as a gauge to determine how much material I should remove from the edges of the hole.
Satisfied with the hole, I moved on to a much more time-consuming task - the painting of the locker. I started by thoroughly cleaning the space with TSP (Trisodium Phosphate) mixed with warm water.
I cleaned all three of the V-berth lockers at the same time, but since this article focuses only on the aft locker, I'll only address this particular space.
The TSP and warm water did a great job at breaking down all the dirt and grime that had accumulated in this space since 1975.
The water was thoroughly disgusting, and it took several different TSP-and-warm-water treatments for me to get this space thoroughly clean.
The space as it appeared after its thorough cleaning.
Another view.
Next, I broke out the acetone and wiped down the entire locker to remove any residue that might remain from the cleaning process.
The rags indicated that this extra effort with the acetone was worth it.
The well-acetoned space.
To make sure that the original paint had enough tooth for the new paint to adhere to it, I lightly sanded all of the original painted surfaces with 100 grit paper.
When I was finished with this sanding, I turned on the Shop-Vac and removed as much of the dust as possible.
I used acetone to remove whatever dust might remain.
Once again, the rag indicated that this application of acetone was not a waste of time.
The thoroughly-cleaned and thoroughly-prepped locker, ready for paint.
To make things more simple, I mixed up the paint in relatively small amounts. I did this on my front porch, which of course was more spacious than the cockpit of the boat. With the pot of paint in hand, I would then walk to the boat to do my work. Note the organic solvent mask at the bottom right. I always wore this when mixing this paint, and I always wore it when applying it.
I started by painting the first two lockers.
When I turned my attention to the aft locker, I started by painting the bulkhead and the battens.
Needing another pot of paint at this point, I stopped and returned to the front porch.
When I climbed back into the boat and started painting the rest of the aft locker, disaster struck. I knocked over the pot of paint, and it spilled its contents inside of the locker. Instinctively, I started to spread the paint around as quickly as possible with the paint brush. As a result, I was able to paint about half the locker in just a few minutes time. With one more pot of paint in hand, I was able to finish the rest of the locker.
The next day, after the first coat of paint had somewhat cured, I came back and mixed up some more paint for the application of a second coat.
Below wee see the aft locker, shortly after the application of the second coat. So was this painting of the locker worth it? Maybe not to some people, but to me it was. I planned to use this space for storing all sorts of things. The dark and dingy gray of the original locker made it difficult for me to see. The white paint, on the other hand, really brightened things up.
Now that I had created, installed, and painted the infrastructure that would support the holding tank and the storage areas around the holding tank, I could call this long, multi-step project complete. The installation of the holding tank itself was a separate project, one that would more properly be classified under the heading of Plumbing. For more on this project, therefore, see my separate article, "Plumbing, Holding Tank, Installation."
This ends this fourth of four postings on the modifications I made to the aft locker in the V-berth of
Oystercatcher, my Ericson 25.


No comments:
Post a Comment