 |
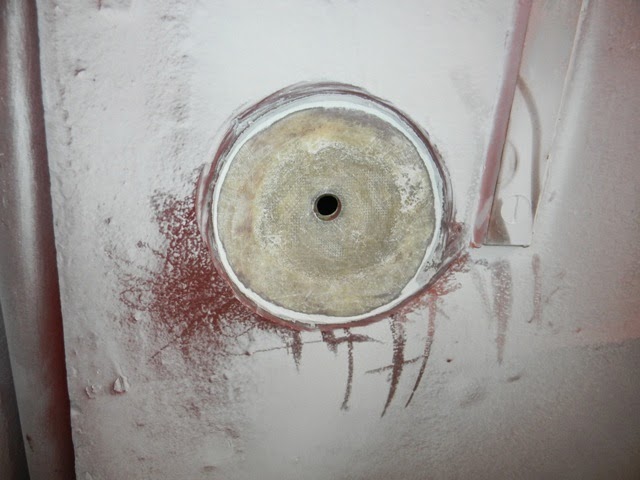
| The filled hole, skimmed with a second coat of thickened epoxy |
Having installed the new copper grounding bar to the hull of
Oystercatcher, my Ericson 25, it was now time for me to fill the nearby hole where the original bronze grounding bolt had been seated. As I explained in my earlier postings, it was impractical to make use of this hole in the mounting of the new copper grounding bar. Therefore, it was necessary for me to fill it.
This job was not very difficult or time-consuming, but only because I had earlier, in the refitting of this boat, filled another hole - an old instrument hole - with epoxy and cloth. For more on this project (which was necessary for me to complete as a part of my project for the installation of a new waste holding tank), see the following article:
https://www.blogger.com/blogger.g?blogID=9059975009563057537#editor/target=post;postID=8978226321866098156;onPublishedMenu=posts;onClosedMenu=posts;postNum=78;src=postname
In preparation for this new job, I laid out some of the essential equipment in advance.
The old bronze bolt that had resided in this hole was 1/2 inch in diameter. The rule of thumb for filling any hole in a fiberglass hull is that the ratio between the hole and the patch should be at a 12:1 ratio. This meant that the patch needed to be six inches in diameter.
My first task, therefore, was to make some reference marks for a six inch circle in preparation for the grinding of the hull.
In case you're wondering about the paint scheme, I had earlier applied two new coats of bottom paint to the hull. There were some areas that I still needed to paint. These were the areas where the boat had been supported by the jackstands during the painting process.
The first layer that I encountered in my grinding of the hull was, of course, the new bottom paint, and then the old layers of bottom paint.
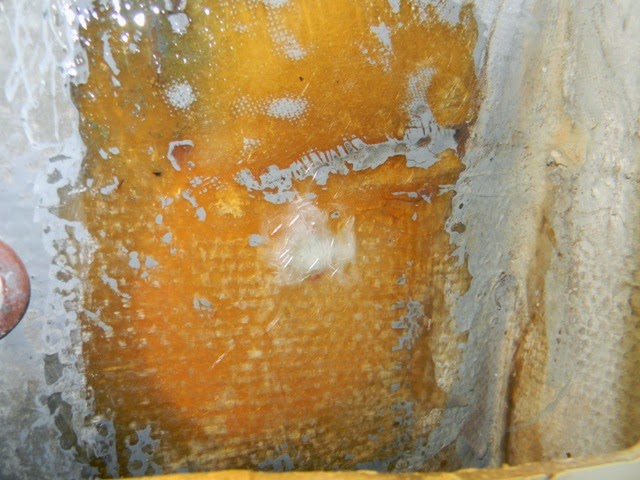
I then began to encounter a new layer - a gray layer. This, as I had determined earlier, in the first hole that I had filled in the hull, was an epoxy barrier coat that one of the previous owners had applied at some point in the past.
In the picture below, we see the gray of the barrier coat with a few spots of white showing through. These spots of white mark the next layer - the gelcoat.
The gelcoat, of course, dated to the time of the manufacture of the boat in 1975.
Having gotten it down as far as the gelcoat, it was now time for me to push through this final layer to the fiberglass of the hull itself.
It was at this point that I began to gently taper the work area, with the outer edge being shallow and the center being somewhat deep.
As I continued this tapering process, I slowly began to see varied layers of fiberglass cloth.
Given that this grinding area was only six inches in diameter, it was difficult for me to taper the centermost spot (around the original bolt hole). The disc on the grinder was just too large for this small area. Therefore, I grabbed my Dremel, with a 50 grit sanding drum attached, and proceeded to taper this small area as well as I could.
As I have said many times, this Dremel was invaluable for many different projects in the refitting of this boat.
After I was finished with the Dremel, I grabbed the grinder once again, just to clean up the outer edges of the work area.
In the picture below we see the work area after it has been ground to my satisfaction.
A view from afar. From this perspective, if you look closely, you can see how the work area tapers towards the original hole.
Another view.
After I was finished on the outside, I turned my attention to the inside.
I wanted to put epoxy and cloth on this side of the hull at the same time that I put it on the other. That way, there would be a chemical bond between the layers via the original bolt hole.
Despite its size, the grinder still provided some assistance in this tight space.
The Dremel, however, provided the majority of the labor.
Notice the bulge in the area forward of the hole. That bulge is the result of many layers of cloth that Ericson laid up at the time of manufacture. The apparent purpose of these extra layers was to provide additional strength to this area where the centerboard pivots on its stainless steel pin.
After I had finished grinding and sanding, I wiped down the entire area with toluene. This would remove sanding reside and other impurities and thus improve the bond between the epoxy and the original fiberglass of the hull.
The fully cleaned up area.
Outside the boat I used the toluene for the same purpose. It was late in the day and the light from within was now visible from without. It might seem that the hull was paper thin, but it wasn't. This is simply the way that fiberglass appears when it lacks paint on either side.
The next day, I took out some scrap pieces of 10 ounce fiberglass cloth and began cutting circular patches for the filling of the hole.
I cut a total of 8 patches, ranging from 5-1/2 inches in diameter to 2 inches. The largest would be the first one I would apply to the hull. The others would follow.
For the inside of the boat, I cut several layers of 12 ounce biaxial cloth.
In preparation for the lay-up of the cloth, I wiped down both sides of the hull one more time, this time with xylene. This solvent is especially useful for removing waxy residue and adhesives. In the event that there was any wax still present from the mold in the manufacturing of the hull, I wanted to make sure that it was eliminated.
The outer hull, prepped and ready.
For this job, I pulled out the colloidal silica and milled fiberglass fibers. The two ingredients together would provide strength for the patch job.

As far as the epoxy was concerned, I used RAKA brand Low Viscosity Resin and 350 Non-Blush Hardener. For the other hole in the hull that I had filled, I had used MAS brand FLAG resin. This resin is rather thick, and it is designed for Filleting, Laminating, and Gluing, thus the FLAG moniker. Since it's thicker, it does not require as much colloidal silica as a thickening agent. If I still had possessed any FLAG resin, I probably would have used it. Since, however, I did not, my only choice was the epoxy that I currently owned - the RAKA described above. RAKA does indeed manufacture a thicker version of their standard Low Viscosity Resin. Conscious of this, I called RAKA and asked them if they thought that the Low Viscosity Resin that I already possessed would be suitable for this particular job. They said that it was, and that it was thus unnecessary for me to order the thicker version of it. This is the sort of honesty that creates loyal customers. RAKA says on their website that they actually answer their phone when you call them to ask a question. In my experience, they have always done this, and they've always been straight shooters.

After wetting out the fiberglass with neat epoxy I applied the first patch and then the second, and so on, until I reached the eighth and final patch. With the application of each patch I would wet out the fiberglass. This insured that each patch was saturated and that the next patch would adhere to the previous one.
Once I had applied all eight pieces of cloth, I mixed colloidal silica and milled fiberglass fibers into the neat epoxy until the entire concoction had the consistency of peanut butter. Below we see all that remains after I have spread the mixture on top of the cloth.
On account of the milled fiberglass fibers, the surface of the patched area had a lumpy or even a fluffy appearance, not unlike cotton candy.
With the exterior of the hull complete (at least for the time being), I moved inside the boat to apply the biaxial cloth.
Wanting the small hole to be completely filled with epoxy (and fillers), I took the small amount that remained in the mixing cup and gently packed it into the hole.
Then, after wetting out the fiberglass around the hole with neat epoxy, I applied the three layers of biaxial cloth.
Afterwards, as we see in the picture above and below, I thickened the epoxy with colloidal silica to the consistency of ketchup and then filled all of the weave in the cloth.
Some time later, after the epoxy had fully cured, I returned to the boat for the purpose of sanding the hull.
The grinder was helpful in taking down the large lumps on the surface of the work area.
As I neared the surface of the hull, I grabbed my random orbital sander, so that I could fair the surface of the work area and make it blend as smoothly as possible into the existing surface of the hull.
As I did this, I wore away some of the bottom paint. This was necessary. Note well that despite my efforts, there were still some pockets here and there where I had neglected to spread the epoxy sufficiently enough during the patching process. This was not surprising to me. The same thing happened the first time I filled another hole in this boat - you know, the old instrument hole on the other side of the boat. This, of course, is the same thing that often happens when you mud the joints in drywall projects in residential construction. That's why you often have to skim the joints one or two more times after the initial work.
After I had done as much sanding as I could possibly do, I pulled out the acetone and cleaned up all of the sanding residue.
Then I mixed up some epoxy, thickened it with colloidal silica, and spread it across the entire work area with a squeegee - a thin piece of plastic used for skimming the surface of a work area such as this one.
After this, all that remained was one final sanding, and two coats of bottom paint in this area of the hull that had never received it.
This ends this posting, the fourth of four, on the steps I took to install a copper grounding bar in the hull of
Oystercatcher, my Ericson 25.


No comments:
Post a Comment